Learning to See: The True Challenge of Photography

Photography isn’t just about pressing the shutter button at the right time—it’s about learning how to truly see. This might sound simple, but I can tell you from years of experience that it’s one of the hardest skills to master.

We often assume that seeing is something we just do, instinctively, like breathing. But in reality, we don’t see the world as it is—we interpret it based on years of accumulated memories, experiences, and subconscious associations. Our brains aren’t cameras; they’re storytellers, filtering and shaping everything we perceive.

When I first started photography, I thought I was paying attention to the world around me. I’d go out with my camera, excited to capture the beauty of nature, only to come home and realize that my photos looked… well, flat and boring. Something was missing, but I couldn’t put my finger on it. The images had all the elements—good lighting, an interesting subject—but they didn’t feel alive.

It took me a long time to understand what was happening. I wasn’t seeing the scene—I was just looking at it.

Why We Struggle to See as Photographers

The biggest mistake many beginners make (myself included) is assuming that the camera will do the seeing for them. We point, focus, and shoot, expecting the image to match the magic we experienced in person. But more often than not, we end up with disappointing results.

Here’s why:

  • Our brains are wired to filter out clutter. When we look at a beautiful landscape, we automatically ignore distractions—power lines, dead branches, trash on the ground. But the camera captures everything, and suddenly those distractions become glaringly obvious.

  • We rely on memory and association more than we realize. A place that holds deep emotional meaning for us might feel powerful in person, but to someone else, a photo of that same spot might feel ordinary.

  • Our visual perception is biased by past experiences. Have you ever thought you captured a sharp, well-composed shot, only to find that it’s actually cluttered and unbalanced when you review it later? That’s because, in the moment, your brain fills in the gaps, making you believe the image is better than it really is.

The Difference Between Looking and Seeing

One of the most valuable lessons I ever learned came from an art teacher who told me: “If you want to take better photos, put the camera down.”

At first, this sounded ridiculous. But he explained that before we can create meaningful images, we need to train our eyes to see composition, light, and emotion—without relying on the camera.

One way to do this is through sketching. And no, you don’t have to be an artist on that. The goal isn’t to create a masterpiece but to force yourself to simplify a scene. When I started doing this, I realized how much unnecessary clutter I had been including in my photos. My sketches were clean and balanced, yet my photos felt chaotic. That exercise alone transformed the way I approach photography.

Another exercise is to spend at least five minutes observing a scene before taking a single photo. Look at the light, the shadows, the small details you might have missed at first glance. Ask yourself: What is the true subject here? What do I want the viewer to feel?

How Memory Shapes Our Perception of Photography

A fascinating thing about photography is that every viewer brings their own memories and associations to an image. What moves one person deeply might feel completely unremarkable to another.

A powerful photograph isn’t just about what is in the frame—it’s about creating an emotional connection that transcends personal experience. This is why the best photographs often rely on universal themes: solitude, adventure, nostalgia, resilience. These emotions are woven into our collective memory, and when an image taps into them, it becomes timeless.

Why Imperfection Can Make a Photo More Powerful

If you’ve ever wondered why some of the most famous photographs in history aren’t technically perfect, this is why.

Take Robert Capa’s D-Day photograph of a soldier struggling through the water. It’s grainy, slightly out of focus, and yet it’s considered one of the greatest images ever taken. Why? Because it feels real. The imperfection adds to the story—it makes us feel like we’re right there in the chaos.

Too often, photographers obsess over sharpness, perfect lighting, and technical precision, but these things don’t always make an image more powerful. In fact, they can sometimes make a photo feel sterile. Real life is messy. Emotion is messy. And sometimes, the best images embrace that.

How to Train Yourself to See Like a Photographer

So, how do you go beyond just looking and start truly seeing?

Here are a few exercises that helped me:

  1. The "No Camera" Challenge: Spend a day exploring without taking a single photo. Instead, pretend your eyes are the camera. Mentally compose shots, study the light, and note the details you would include or exclude.

  2. The Sketching Exercise: Before snapping a photo, quickly sketch out your composition. You’ll be surprised at how much cleaner and more intentional your framing becomes.

  3. Shoot with One Prime Lens: Using a fixed focal length (like a 50mm or 35mm) forces you to move your feet and compose with intention, rather than lazily zooming in and out.

  4. Limit Yourself to 10 Shots: When you’re in the field, challenge yourself to take no more than ten images of a scene. This forces you to be selective and deliberate rather than mindlessly snapping away.

  5. Study the Masters: Look at iconic photographs and ask yourself—what makes this image powerful? Is it the composition? The emotion? The use of light?

Join My Photography Workshops and Transform the Way You See the World

Learning to truly see is the key to creating powerful, unforgettable images—and that’s exactly what we focus on in my photography workshops. Whether you're a complete beginner or you already have a good photography background my workshops are designed to sharpen your vision, refine your technique, and push your creativity to the next level.

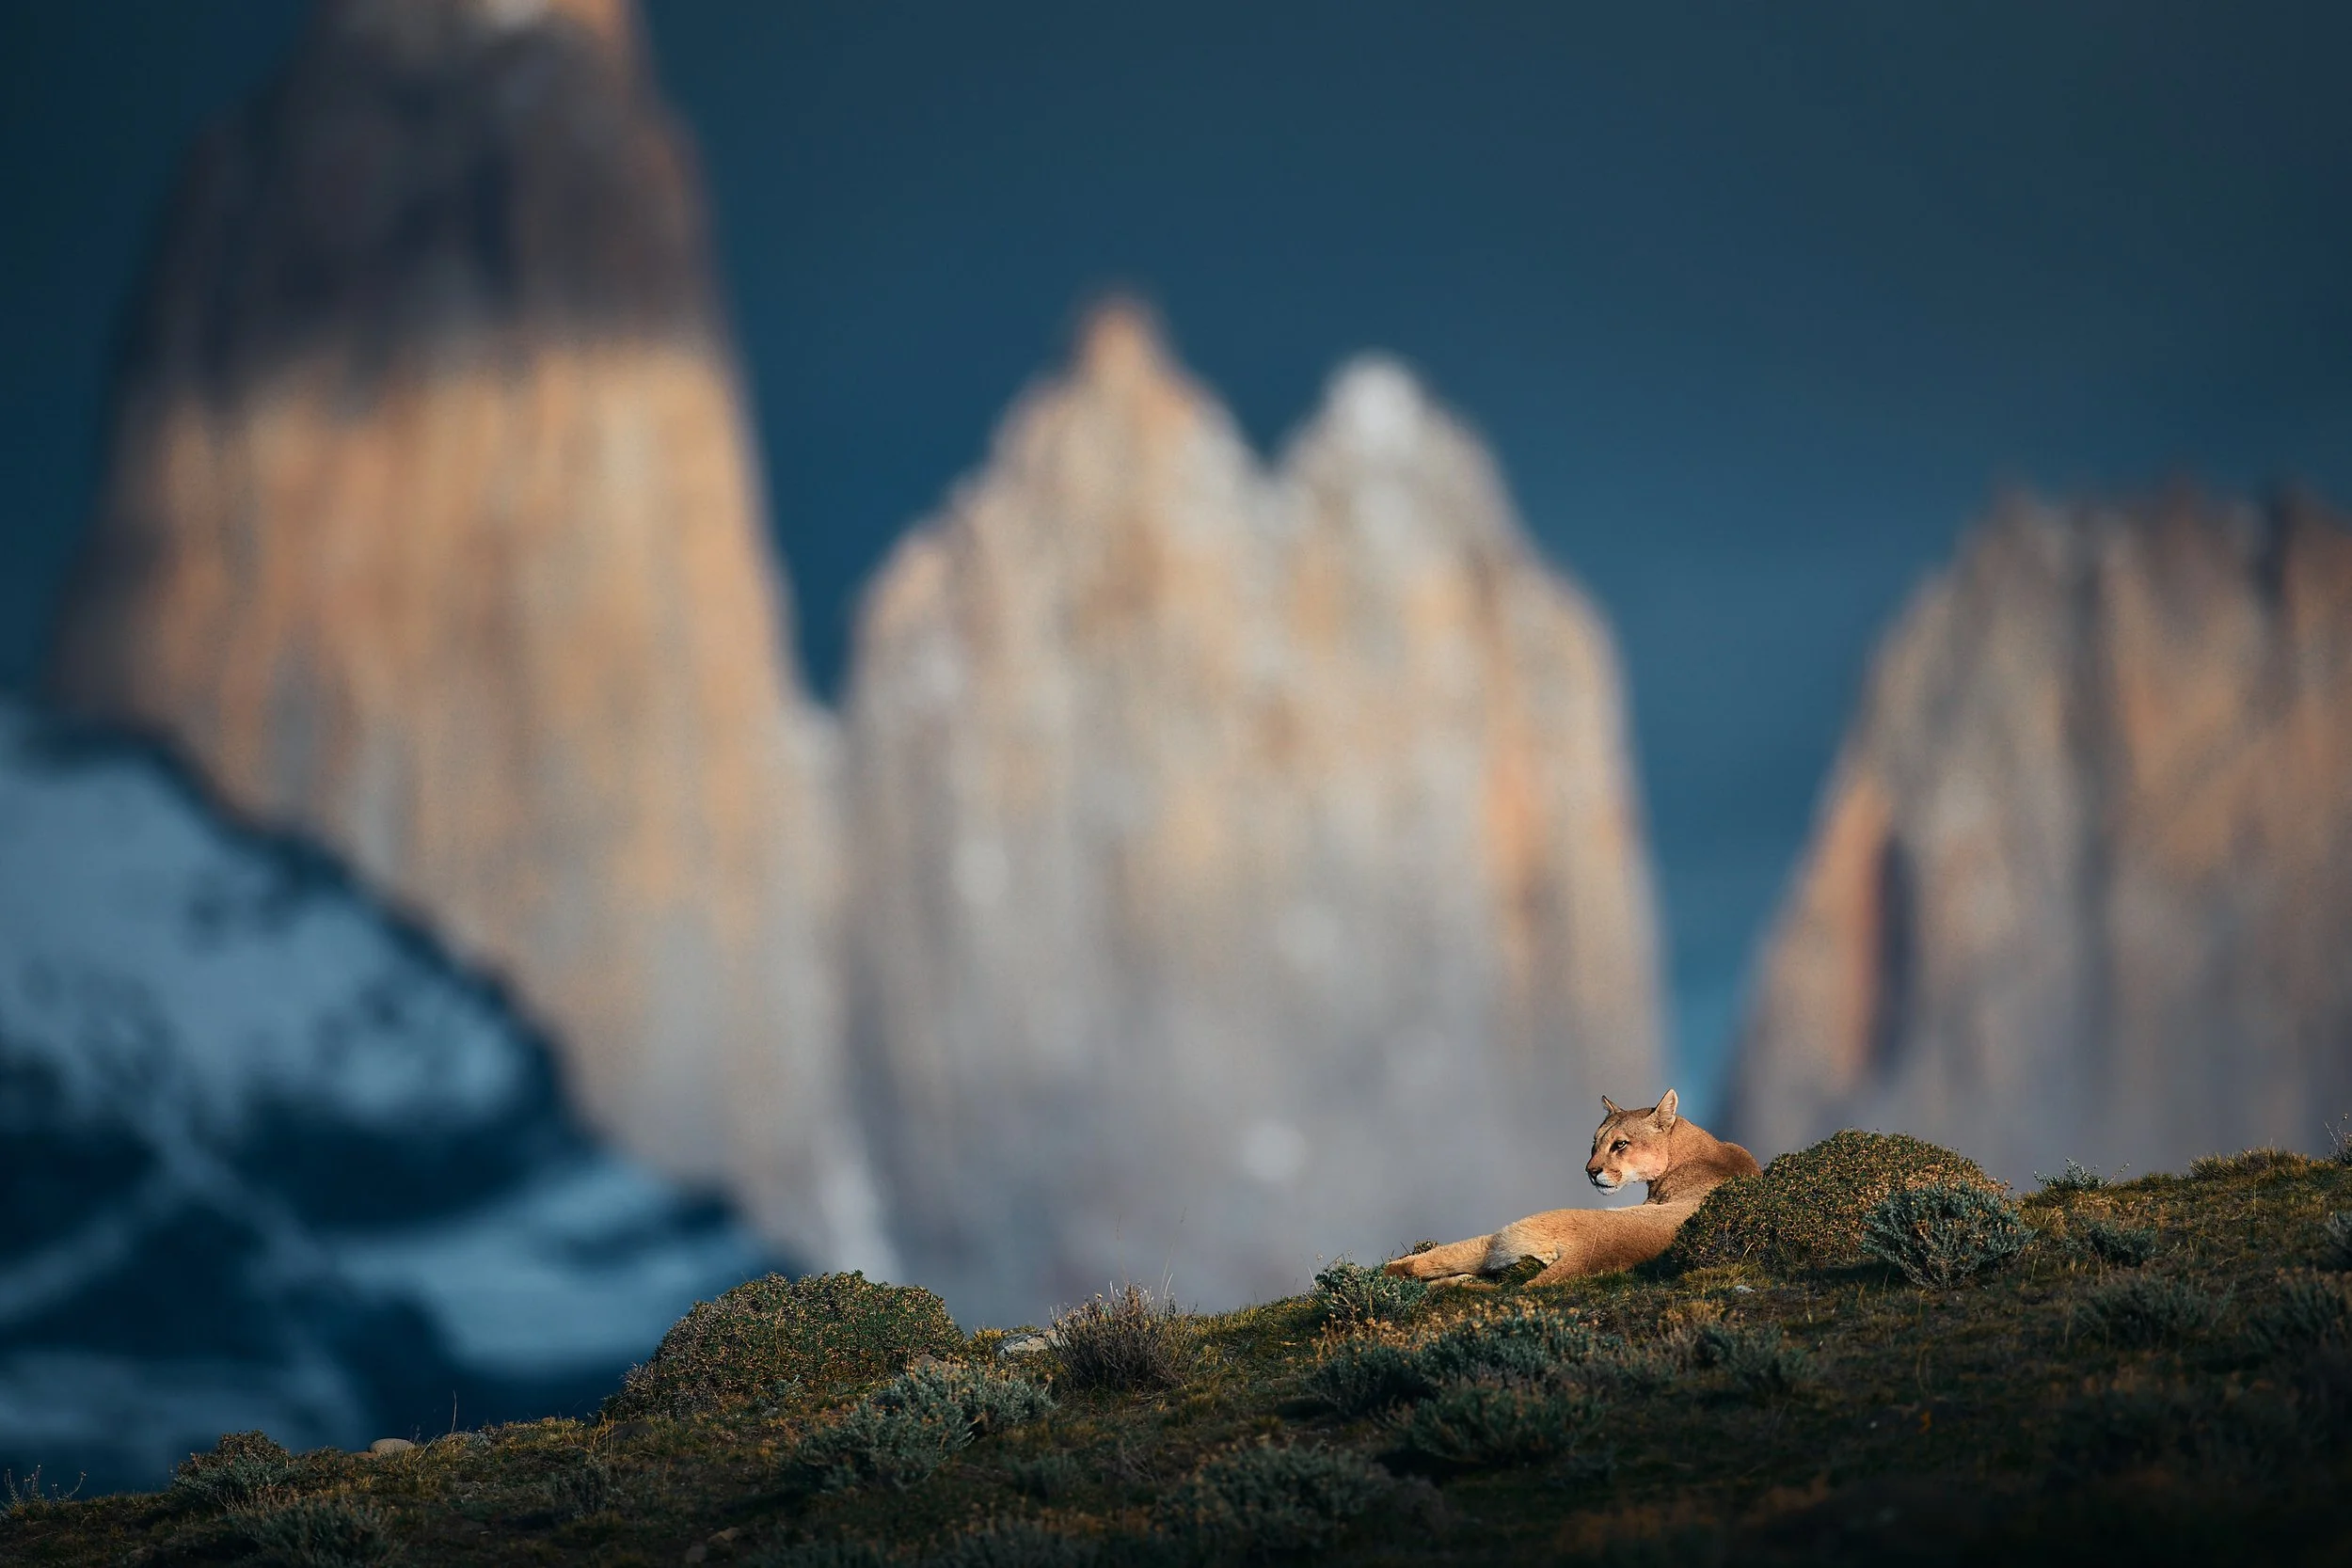
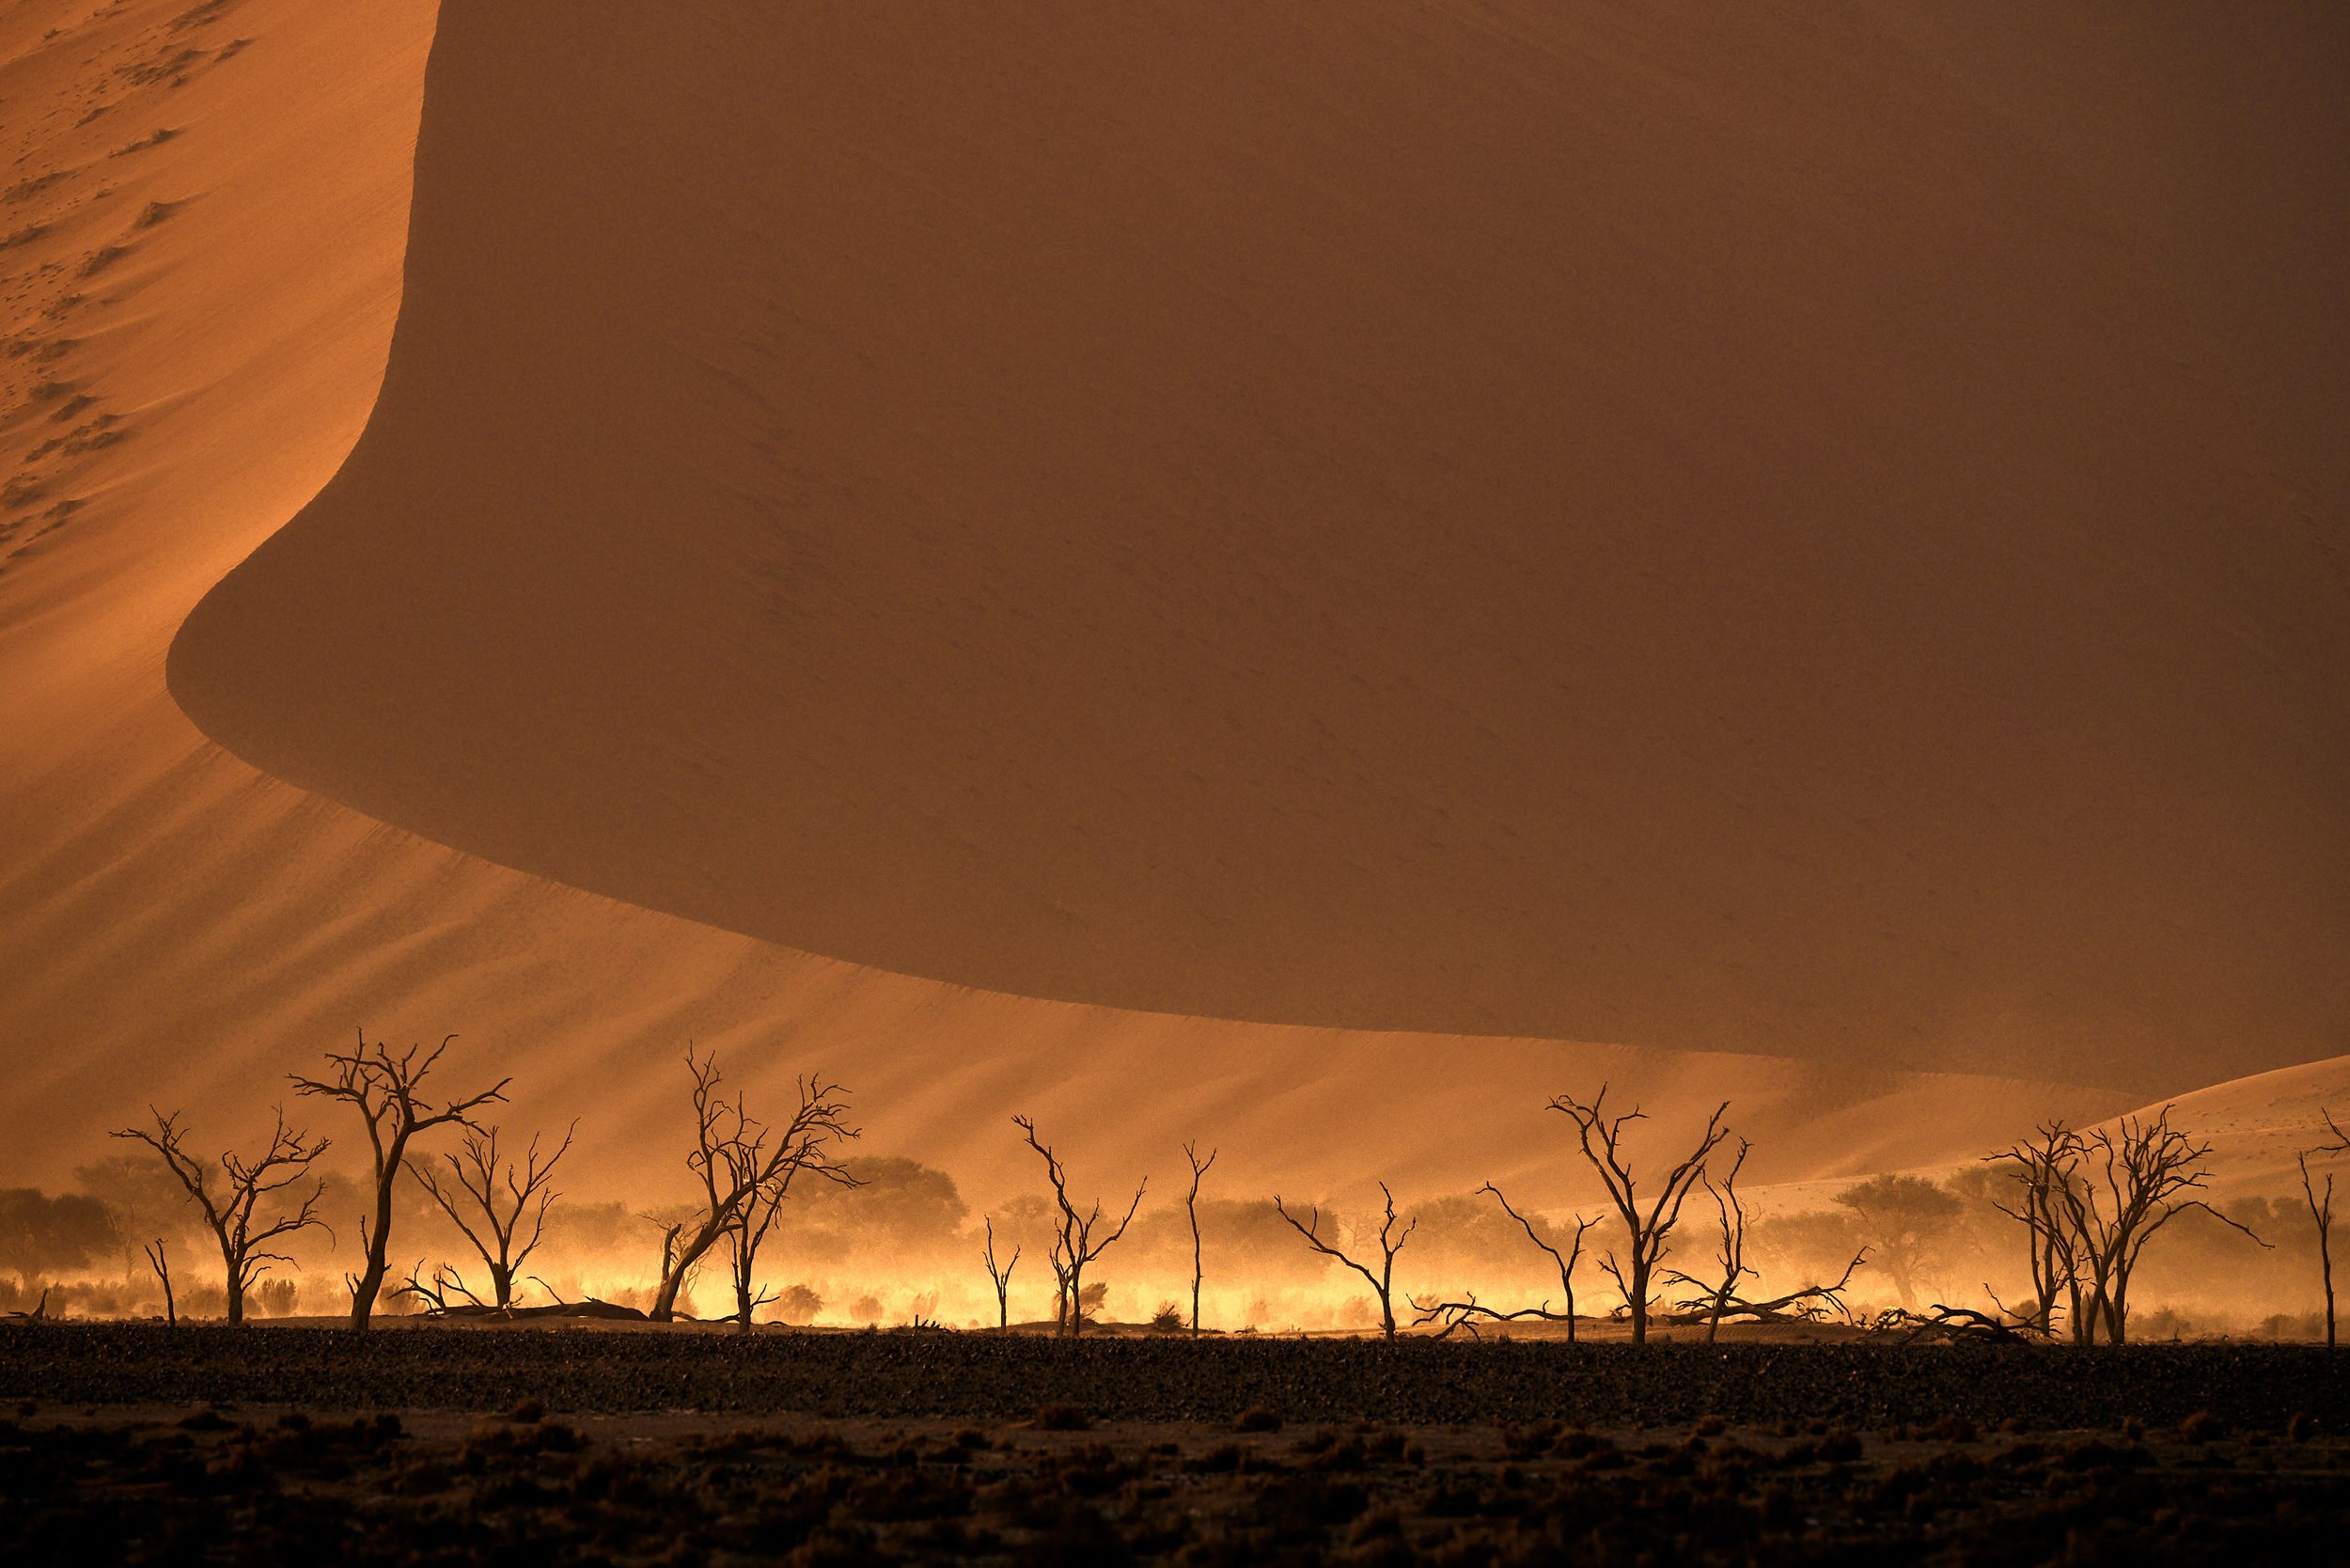
Join me in some of the world’s most breathtaking locations—from the wild plains of Namibia to the dramatic peaks of Patagonia—where you'll get hands-on experience, personalized coaching, and a chance to immerse yourself in the art of storytelling through photography.


The Art of Seeing

Learning to see is a lifelong journey. Even after years behind the camera, I still catch myself falling into old habits—rushing my shots, overlooking distractions, failing to truly connect with the scene.

But that’s the beauty of photography. It’s not just about capturing the world as it is—it’s about discovering how we experience it.

So, next time you pick up your camera, slow down. Look deeper. Challenge yourself to go beyond just looking—and start seeing. Because the most powerful photographs aren’t the ones that simply show a subject—they’re the ones that make us feel something.

Full-Frame vs Crop Sensor for Wildlife Photography: Which One is Best for You?

Wildlife photography demands the right gear; what camera should I choose? What lens should I bring?

One of the biggest debates is full-frame vs crop sensor cameras. Which one is better for capturing fast-moving animals and render images in the best way? Some swear by the better low-light performance and dynamic range of full-frame cameras, while others prefer the extra reach and affordability of crop sensors. But which is truly the best for you? Let’s break down the key differences to help you make an informed decision!

Understanding Sensor Size in Wildlife Photography

What is a Full-Frame Sensor?

A full-frame sensor is a digital camera sensor that matches the size of 35mm film - 36mm x 24mm. It gets its name from the fact that early digital cameras had smaller sensors, so when manufacturers released one with the same size as classic film, they called it "full-frame."

A full-frame sensor has larger individual pixels, which help capture more light, improving performance in low-light conditions. This results in better image quality, higher dynamic range, and reduced noise at high ISO settings, making full-frame cameras a popular choice for wildlife and landscape photographers.

What is a Crop Sensor? (APS-C, Micro Four Thirds)

A crop sensor is any sensor smaller than full-frame. The two most common types in wildlife photography are APS-C (roughly 22mm x 15mm, depending on the brand) and Micro Four Thirds (17mm x 13mm). These sensors crop the field of view compared to full-frame, which means they provide an apparent magnification effect on lenses - a key advantage for wildlife photography.

Crop sensors are popular among entry-level and enthusiast wildlife photographers because they are cheaper, lighter, and offer extended reach. For example, an APS-C sensor with a 1.5x or 1.6x crop factor makes a 300mm lens behave like a 450mm or 480mm lens, getting you closer to distant wildlife without spending thousands on super-telephoto lenses.

How Sensor Size Impacts Image Quality, Depth of Field, and Low-Light Performance

Sensor size affects image quality in several ways:

  • Larger sensors (full-frame) generally capture more light per pixel, improving dynamic range and low-light performance. This means cleaner images at high ISO and better detail in shadows and highlights.

  • Smaller sensors (crop sensors) introduce more noise at high ISO due to smaller pixels, but they increase depth of field, which can be beneficial for certain wildlife shots where you need more of your subject in focus.

If you often shoot in low light (dawn, dusk, or dense forests), full-frame has a clear advantage. However, if reach and portability are your top priorities, a crop sensor might be the smarter choice.

Shooting with canon R5 in Sossusvlei, Namibia

The Crop Factor Explained and How It Affects Focal Length

The crop factor refers to how a smaller sensor crops the field of view compared to full-frame. APS-C sensors typically have a 1.5x crop factor (Nikon, Sony) or 1.6x (Canon), while Micro Four Thirds has a 2x crop factor.

For wildlife photographers, this means a 400mm lens on a Canon APS-C camera (1.6x crop) gives an effective focal length of 640mm. This is a huge advantage when photographing distant animals, as it gives more reach without needing a longer (and more expensive) lens.

However, the crop factor doesn’t increase actual optical magnification—it just narrows the field of view, which can sometimes make composing shots a bit tricky.

Pros and Cons of Full-Frame Sensors for Wildlife Photography

Advantages of Full-Frame Sensors

Better Low-Light Performance – Larger pixels capture more light, leading to less noise and better detail at high ISO. Essential for early morning or twilight wildlife shots.

Higher Dynamic Range – Full-frame sensors handle high-contrast scenes better, retaining details in both bright highlights and deep shadows.

Shallower Depth of Field – Using a longer lens to get the same magnification helps to create a more natural background blur (bokeh), helping isolate subjects from busy backgrounds.

Better Image Quality at High ISO – A must-have for night safaris or dense forests, where high ISO settings (3200-12800) are often needed.

Disadvantages of Full-Frame Sensors

More Expensive – Full-frame cameras cost more upfront, and their lenses are also more expensive.

Larger & Heavier – Carrying a full-frame setup with a 600mm lens on a long trek is no joke. Heavier gear can be tiring, especially for handheld shooting.

Less Effective Telephoto Reach – A 500mm lens on a full-frame camera is just 500mm, whereas on an APS-C crop sensor, it effectively acts like 750mm. If reach matters, crop sensors have the edge.

Alpine wildlife safari with a Canon R3 and 600mm f4.

Pros and Cons of Crop Sensors for Wildlife Photography

Advantages of Crop Sensors

Extra Reach with Crop Factor – A 1.5x or 1.6x crop factor makes a 300mm lens act like 450mm or more, perfect for distant wildlife shots.

More Affordable – Crop sensor cameras and lenses are cheaper, making them ideal for beginners and those on a budget.

Lighter and More Compact – Perfect for hiking, travel, and handheld shooting. A crop sensor body with a 100-400mm lens is far easier to carry than a full-frame with a 600mm prime.

More Depth of Field – More of the subject remains in focus, which can be useful when photographing fast-moving animals.

Disadvantages of Crop Sensors

Lower Low-Light Performance – Smaller pixels struggle in dim conditions, leading to more noise at ISO 6400+.

Reduced Dynamic Range – Shadows and highlights clip more easily, making it harder to recover details in high-contrast scenes.

Limited Lens Selection – Many pro wildlife lenses are designed for full-frame, so crop shooters have fewer options for high-end glass.

Key Considerations When Choosing Between Full-Frame and Crop Sensor

📌 Budget: Full-frame costs more, but offers better image quality. Crop sensors are affordable and great for reach.

📌 Shooting Style: If you shoot low-light or high-contrast environments, full-frame is better. If you need extra reach, crop sensors win.

📌 Portability Needs: Traveling or hiking? Crop sensor setups are usually lighter and easier to carry.

📌 Future Goals: If you plan to go pro, investing in full-frame early may be the best move.

All of this said, I’ve been shooting with several different cameras, both full frame and aps-c, over the years. In my opinion, full frame is always the winner. The only disadvantage, if we can call it like that, is that we need a longer focal length to fill the frame. This might also be seen as an advantage, as the compression of longer lenses looks much better than just “cropping in” as we do with aps-c sensors.

Final Verdict – Which One Should You Choose?

🔹 If you need the absolute best image quality, dynamic range, and low-light performance → go Full-Frame.
🔹 If budget, extra telephoto reach, and portability matter more → go Crop Sensor.
🔹 If you want to build your setup over time, consider getting a Crop Sensor camera paired with full frame lenses. This will allow you to build your lens collection and, when you will be ready, you can upgrade your camera body to a full frame one.

Ready to Take Your Wildlife Photography Further?

Put these techniques into action on an unforgettable adventure! Join me on one of my guided wildlife photography workshops or safari trips to Namibia, Botswana, Zambia and other incredible destinations worldwide.

You’ll receive personalized instruction, visit spectacular wildlife hotspots, and dramatically improve your photography in a once-in-a-lifetime adventure.


Photographer's Guide to Sossusvlei: Capturing Namibia's Iconic Landscapes

Nestled within Namibia's Namib-Naukluft National Park, Sossuslvei is a haven for landscape photographers. Its towering red dunes (the tallest and oldest in the world), stark white clay pans, and ancient camelthorn trees offer a surreal canvas for capturing nature's artistry. Over the years I’ve been visiting Sossusvlei multiple times and those incredible views never fail to amaze me. However there are a few things I learned over time that I wish I had known earlier. Drawing from my experiences and insights from fellow photographers, here's a comprehensive guide to making the most of your photographic journey in this mesmerizing desert landscape.​

1. Secure Accommodation Inside the Park

To truly capitalize on the enchanting light of dawn and dusk, it's imperative to stay within the park's confines. In fact, Sossusvlei operates with two main gates:​

  • Outer Gate: Opens at sunrise and closes at sunset, restricting access during prime photography hours.​

  • Inner Gate: Opens one hour before sunrise and closes one hour after sunset, granting photographers the coveted golden hours.​

If you consider that from Sesriem you still have to drive 40 to 60 km to reach your shooting location (plus 7km on sand and 20 mins walking for Deadvlei) it’s clear that the outer gate timing won’t allow you to capture the beautiful golden hour on the dunes. For this reason is paramount to get accommodation inside of the park, past the outer gate.

Accommodations like the Sossus Dune Lodge, Sesriem NWR Campsite, and Oshana Camp are situated inside the inner gate. Staying here ensures you're on location when the light is at its best. Given their popularity, it's advisable to book well in advance - and I mean, WELL in advance. Accommodation inside the park is limited and might fill up very soon. I’d suggest you to book at least 6 months before your visit to secure your access.

2. Plan Your Shoots Around Optimal Lighting

The desert's lighting transforms dramatically throughout the day:​

  • Sunrise: Soft, golden hues illuminate the dunes, creating long shadows and enhancing textures.​

  • Midday: Harsh light can wash out colors and reduce contrast, making it less ideal for photography.​

  • Sunset: Warm tones return, casting a magical glow over the landscape.​

Prioritize shooting during the early morning and late afternoon to harness these favorable conditions. Midday can be reserved for rest, scouting locations, or capturing abstract shots that play with the intense sunlight.​

My go-to daily schedule in Sossusvlei includes waking up very early, having a quick coffee and packing up so that we can be at the gat at least 10 minutes before opening. This will allow me to be amongst the first car to drive into the park. At sunrise I usually go towards Deadvlei, shooting for about 2 hours till the light becomes too harsh and the main tourists start coming in from the outer gate. I will then leave and drive back to Sesriem for a good brunch and some hours of rest in the shade before heading back at mid afternoon, usually around dune 45 or dune 39, to find my spot for the sunset session.

3. Equip Yourself with Essential Gear

The unique environment of Sossusvlei demands specific equipment:​

  • Lenses: you can use anything from super wide to super telephoto, but expect to be shooting more in the mid telephoto range. The landscape is very empty and vast and the telephoto helps compressing elements, making for interesting, minimal compositions.​

  • Tripod: Essential for stability during low-light conditions and for precise compositions. While you can always shoot wide open, if you are going for stylized, minimalist landscapes my advice is to stop down to f8 or f11, especially on telephotos, so that all the lines in your frame are sharp and crisp.

  • Filters: I rarely use polarizers but Sossusvlei is one of the exceptions. The dunes are reflecting an incredible amount of light and using a polarizer will improve dramatically the contrast in your image.​

  • Cleaning Kit: Dust and sand are unavoidable here, and it’s paramount to bring some camera cleaning tools. Expect to be cleaning your gear multiple times a day, and try to avoid changing lenses out in the dunes to prevent dust to reach your camera’s sensor.​

4. Explore Iconic and Lesser-Known Locations

Sossusvlei offers a plethora of photographic opportunities:​

  • Deadvlei: This clay pan, adorned with centuries-old dead camelthorn trees set against white sands and encircled by red dunes, provides a stark and captivating contrast. Photo opportunities are endless, but it might also be quite challenging. It’s the furthest location you can access in Sossusvlei: form the inner gate in Sesriem you must drive the 60km tar road to the end, then you switch on your 4x4 and drive about 7km on sand. Once you reach the parking area you still have to walk approx 20 min over a small dune to access it.

  • Dune 45: Easily accessible and famed for its elegant shape, this 80-meter-high dune is often dubbed "the most photographed dune in the world." The number indicates the distance from the gate, meaning that we will have to drive 45km back to Sesriem. This is a go-to spot for sunset sessions, as we can stay till the sun is set before driving back.

  • Big Daddy: Standing approximately 325 meters tall, it's one of the highest dunes in the area and offers panoramic views for those who undertake the climb. You can do it after a sunrise session in Deadvlei, but remember to bring with you a lot of water - it gets crazy hot out there!

  • Hiddenvlei: A more secluded spot, it’s a good option for photographers that don’t want to deal with the crowds in Deadvlei. ​

5. Respect the Fragile Ecosystem

The beauty of Sossusvlei comes with a responsibility to preserve its delicate environment:​

  • Stay on Designated Paths: Avoid creating new trails that can lead to erosion.​

  • Avoid Touching Ancient Trees: The dead camelthorn trees in Deadvlei are estimated to be around 900 years old; avoid touching or, worst, sitting on them. ​

  • Carry Out All Waste: Ensure no litter is left behind, maintaining the pristine nature of the desert.​

  • Stay within the speed limits: The limit inside the park is 60km/h. If you are ready at the gate at opening time, there’s no need to speed. Also avoid staying too late in the park and then speed to get out in time. There’s plenty of orix running around when is dark and it’s very likely to end in a car accident when driving at night.

  • Do not use drones: Drones are not allowed in the park. Unless you apply for a permit trough the park service, avoid using them or you can get a very high fine. ​ ​

Photographing Sossusvlei is a transformative experience, offering scenes that seem otherworldly. By planning meticulously, respecting the environment, and embracing the unique challenges of desert photography, you'll capture images that resonate with the timeless beauty of Namibia's iconic dunes.​

Join Our Photography Workshops

If you're eager to explore Sossusvlei and other breathtaking landscapes with guided expertise, consider joining one of my photography workshops.

We offer tailored experiences that cater to various skill levels, ensuring you leave with both stunning images and enriched knowledge.

For more infos and inspiration about Sossusvlei check out this video guide:

Wildlife Photography Workshops: Best Locations to Elevate Your Skills in 2025

Discover the best locations for wildlife photography workshops in 2024! From the vast savannas of Africa to the icy landscapes of the Arctic, find top destinations to refine your skills, capture stunning wildlife shots, and learn from expert photographers.

Read More

Never Miss the Shot Again: How to Use the Focus Preset Feature for Wildlife Photography

When photographing wildlife very often speed is critical. You've likely experienced the frustration of missing focus on fast-moving animals, even with high-end telephoto lenses and the latest camera systems. And the worse situation is when your autofocus is stuck on the background and refuses to jump back and lock into a subject just in front of you. This happens especially with the longest focal lengths, as the foreground can sometimes be so blurred that the camera’s brain can’t recognize a subject close to us.

Read More

Ultimate Guide to Safari Photography: Tips and Techniques for Capturing Amazing Wildlife Photos

A photo safari is one of the most rewarding experiences for photographers. It offers incredible opportunities to photograph wildlife in their natural habitat, but it also comes with challenges unique to this environment. After more than ten years as a professional wildlife and nature photographer, I've gathered techniques that significantly improved my photography during safaris—and today, I'm sharing these insights with you.

Read More

Ultimate Photography Guide to Etosha National Park

Etosha National Park is one of Africa's premier wildlife destinations and a paradise for photographers. It’s unique landscape and environment create unique challenges for the photographer, but once I learnt how to approach it it became one of my favorite destinations in the world for wildlife.

Read More

Negative space in wildlife photography

A compelling wildlife photograph goes beyond capturing a moment. It’s about creating an image that resonates emotionally, draws the viewer in, and tells a story. Composition is the framework that transforms a technically good photograph into a great one. By mastering composition techniques you can elevate your wildlife photography to new heights.

Read More

Mastering Back Button Autofocus: A Game-Changer for Your Photography

Are you looking to take your photography skills to the next level? Back button focus (BBF) might be the secret weapon you’ve been missing. This technique, very popular among professional photographers, separates the autofocus function from the shutter button, giving you unparalleled control and precision.

Read More