
Learning to See: The True Challenge of Photography
Photography isn’t just about pressing the shutter button at the right time—it’s about learning how to truly see. This might sound simple, but I can tell you from years of experience that it’s one of the hardest skills to master.
We often assume that seeing is something we just do, instinctively, like breathing. But in reality, we don’t see the world as it is—we interpret it based on years of accumulated memories, experiences, and subconscious associations. Our brains aren’t cameras; they’re storytellers, filtering and shaping everything we perceive.

When I first started photography, I thought I was paying attention to the world around me. I’d go out with my camera, excited to capture the beauty of nature, only to come home and realize that my photos looked… well, flat and boring. Something was missing, but I couldn’t put my finger on it. The images had all the elements—good lighting, an interesting subject—but they didn’t feel alive.
It took me a long time to understand what was happening. I wasn’t seeing the scene—I was just looking at it.
Why We Struggle to See as Photographers
The biggest mistake many beginners make (myself included) is assuming that the camera will do the seeing for them. We point, focus, and shoot, expecting the image to match the magic we experienced in person. But more often than not, we end up with disappointing results.
Here’s why:
Our brains are wired to filter out clutter. When we look at a beautiful landscape, we automatically ignore distractions—power lines, dead branches, trash on the ground. But the camera captures everything, and suddenly those distractions become glaringly obvious.
We rely on memory and association more than we realize. A place that holds deep emotional meaning for us might feel powerful in person, but to someone else, a photo of that same spot might feel ordinary.
Our visual perception is biased by past experiences. Have you ever thought you captured a sharp, well-composed shot, only to find that it’s actually cluttered and unbalanced when you review it later? That’s because, in the moment, your brain fills in the gaps, making you believe the image is better than it really is.

The Difference Between Looking and Seeing
One of the most valuable lessons I ever learned came from an art teacher who told me: “If you want to take better photos, put the camera down.”
At first, this sounded ridiculous. But he explained that before we can create meaningful images, we need to train our eyes to see composition, light, and emotion—without relying on the camera.

One way to do this is through sketching. And no, you don’t have to be an artist on that. The goal isn’t to create a masterpiece but to force yourself to simplify a scene. When I started doing this, I realized how much unnecessary clutter I had been including in my photos. My sketches were clean and balanced, yet my photos felt chaotic. That exercise alone transformed the way I approach photography.
Another exercise is to spend at least five minutes observing a scene before taking a single photo. Look at the light, the shadows, the small details you might have missed at first glance. Ask yourself: What is the true subject here? What do I want the viewer to feel?
How Memory Shapes Our Perception of Photography
A fascinating thing about photography is that every viewer brings their own memories and associations to an image. What moves one person deeply might feel completely unremarkable to another.
A powerful photograph isn’t just about what is in the frame—it’s about creating an emotional connection that transcends personal experience. This is why the best photographs often rely on universal themes: solitude, adventure, nostalgia, resilience. These emotions are woven into our collective memory, and when an image taps into them, it becomes timeless.
Why Imperfection Can Make a Photo More Powerful
If you’ve ever wondered why some of the most famous photographs in history aren’t technically perfect, this is why.
Take Robert Capa’s D-Day photograph of a soldier struggling through the water. It’s grainy, slightly out of focus, and yet it’s considered one of the greatest images ever taken. Why? Because it feels real. The imperfection adds to the story—it makes us feel like we’re right there in the chaos.
Too often, photographers obsess over sharpness, perfect lighting, and technical precision, but these things don’t always make an image more powerful. In fact, they can sometimes make a photo feel sterile. Real life is messy. Emotion is messy. And sometimes, the best images embrace that.


How to Train Yourself to See Like a Photographer
So, how do you go beyond just looking and start truly seeing?
Here are a few exercises that helped me:
The "No Camera" Challenge: Spend a day exploring without taking a single photo. Instead, pretend your eyes are the camera. Mentally compose shots, study the light, and note the details you would include or exclude.
The Sketching Exercise: Before snapping a photo, quickly sketch out your composition. You’ll be surprised at how much cleaner and more intentional your framing becomes.
Shoot with One Prime Lens: Using a fixed focal length (like a 50mm or 35mm) forces you to move your feet and compose with intention, rather than lazily zooming in and out.
Limit Yourself to 10 Shots: When you’re in the field, challenge yourself to take no more than ten images of a scene. This forces you to be selective and deliberate rather than mindlessly snapping away.
Study the Masters: Look at iconic photographs and ask yourself—what makes this image powerful? Is it the composition? The emotion? The use of light?

Join My Photography Workshops and Transform the Way You See the World
Learning to truly see is the key to creating powerful, unforgettable images—and that’s exactly what we focus on in my photography workshops. Whether you're a complete beginner or you already have a good photography background my workshops are designed to sharpen your vision, refine your technique, and push your creativity to the next level.
Join me in some of the world’s most breathtaking locations—from the wild plains of Namibia to the dramatic peaks of Patagonia—where you'll get hands-on experience, personalized coaching, and a chance to immerse yourself in the art of storytelling through photography.
The Art of Seeing
Learning to see is a lifelong journey. Even after years behind the camera, I still catch myself falling into old habits—rushing my shots, overlooking distractions, failing to truly connect with the scene.
But that’s the beauty of photography. It’s not just about capturing the world as it is—it’s about discovering how we experience it.
So, next time you pick up your camera, slow down. Look deeper. Challenge yourself to go beyond just looking—and start seeing. Because the most powerful photographs aren’t the ones that simply show a subject—they’re the ones that make us feel something.


Best Wildlife Photography Camera Settings
Discover the best wildlife photography camera settings for any camera! This guide covers shutter speed, aperture, ISO, autofocus, and pro tips to capture stunning wildlife shots.
Wildlife photography is all about capturing those fleeting, magical moments. But here’s the thing: no matter how incredible the moment is, if your camera settings aren’t dialed in correctly, you’ll end up with a blurry, noisy, or poorly exposed image. And that? That’s the fastest way to turn an epic shot into a missed opportunity.
I’ve been there. Early on, I remember photographing a leopard at sunrise in a private reserve in Namibia. The golden light was perfect, but I was so caught up in the moment that I didn’t check my exposure dial. The result? An overexposed fur - and an unusable photo. Since then, I’ve learned that understanding exposure settings isn’t just technical jargon—it’s the key to nailing sharp, detailed wildlife shots every single time.
In my early days I’d find quite difficult to nail exposure, especially in high contrast and fast changing conditions.
At its core, exposure is controlled by three main settings: shutter speed, aperture, and ISO. These work together like a finely tuned engine, and knowing how to adjust them based on lighting conditions and animal behavior will make or break your shot.
Shutter speed determines how quickly your camera captures movement. A fast shutter speed (1/2000s or higher) freezes action, while a slow one introduces motion blur.
Aperture controls the depth of field—how much of your image is in focus. A wide aperture (f/2.8-f/5.6) isolates your subject beautifully, while a narrower aperture (f/8-f/11) keeps more of the scene sharp.
ISO affects brightness and noise. Modern cameras handle high ISOs well, but balancing it with the other settings is key to avoiding unnecessary grain.
In this quick video you will find a complete explanation of these concepts:
The trick is to adjust these settings dynamically. If the light changes or the animal moves, your settings should adapt instantly. That’s why knowing them inside and out is crucial—it lets you respond to the scene without fumbling through menus.
Best Shutter Speed for Wildlife Photography
Shutter speed can make or break a wildlife shot. Too slow, and you’ll get motion blur where you don’t want it. Too fast, and you might push your ISO too high, introducing noise. Finding that sweet spot takes practice, but once you get a feel for it, it becomes second nature. Let’s break it down based on different scenarios so you can confidently adjust on the fly.
Fast-Moving Subjects: Birds in Flight & Running Mammals
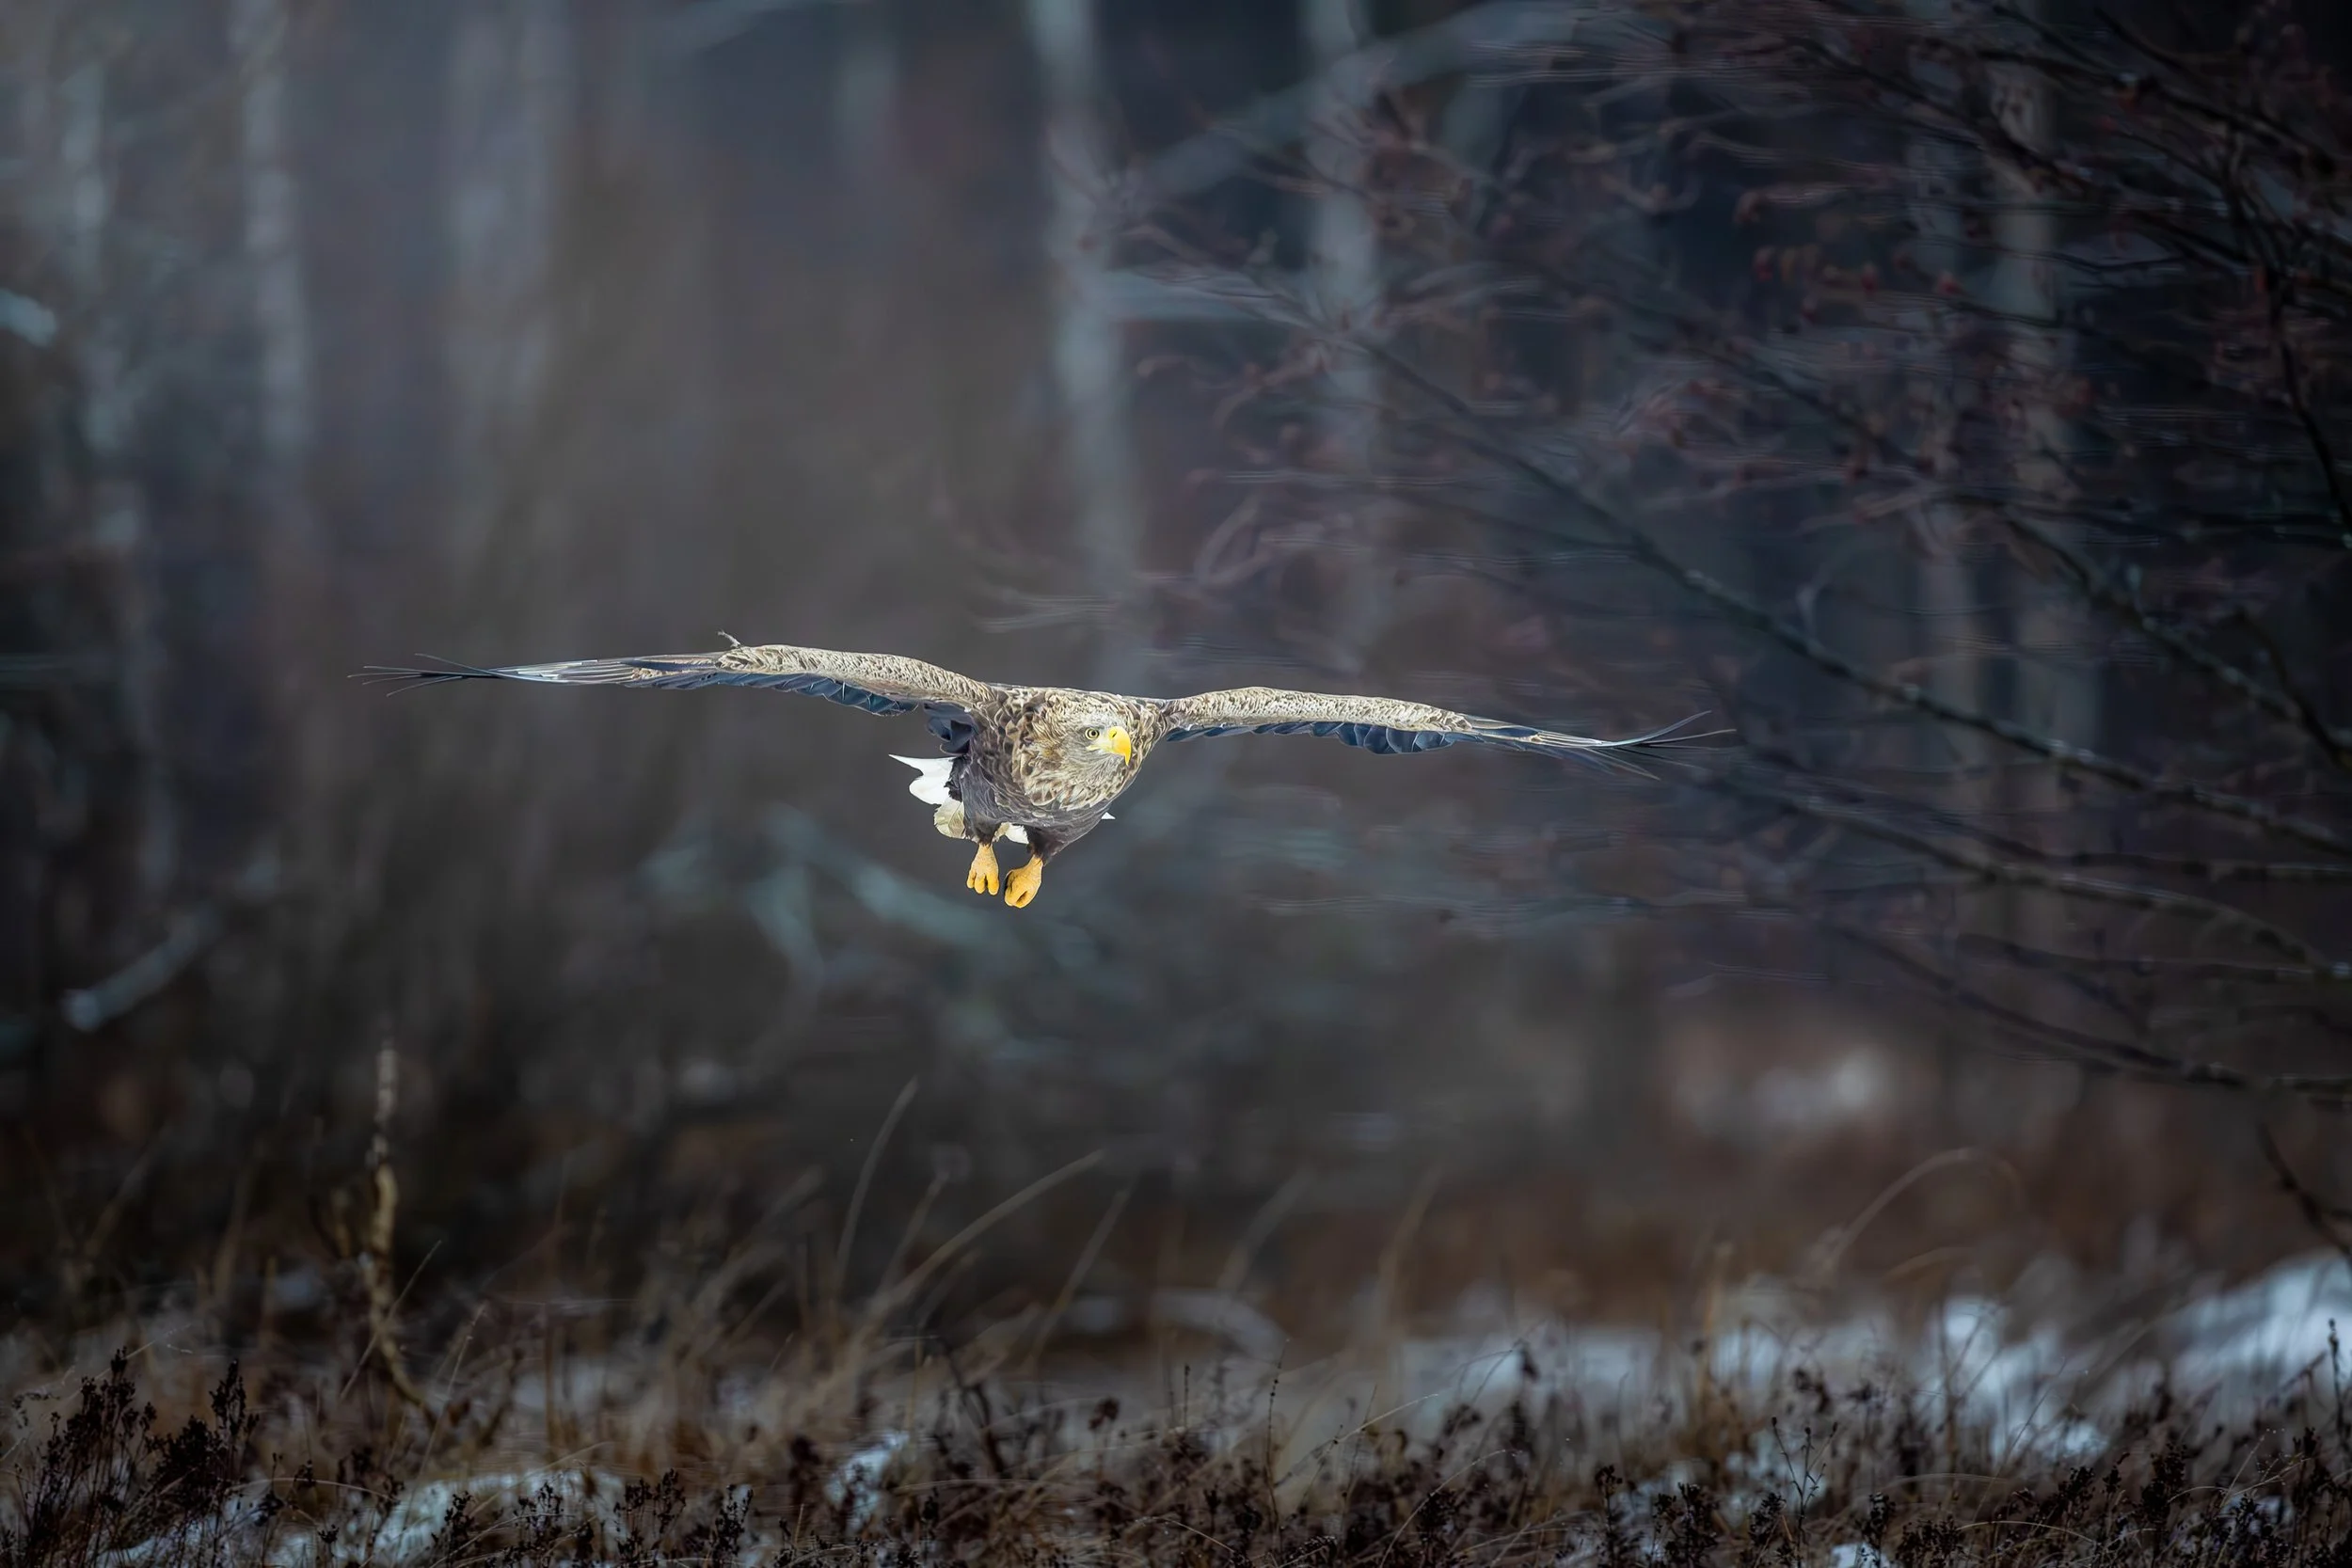
If you’ve ever tried capturing a bird mid-flight only to end up with a blurry mess, your shutter speed was probably too slow. For fast action, like birds in motion or cheetahs sprinting, you need a shutter speed of at least 1/3200s. Some birds—especially smaller, erratic ones like swallows—may even require 1/4000s or higher.

For fast subjects like birds you need to go as high as 1/4000s to get a sharp image.
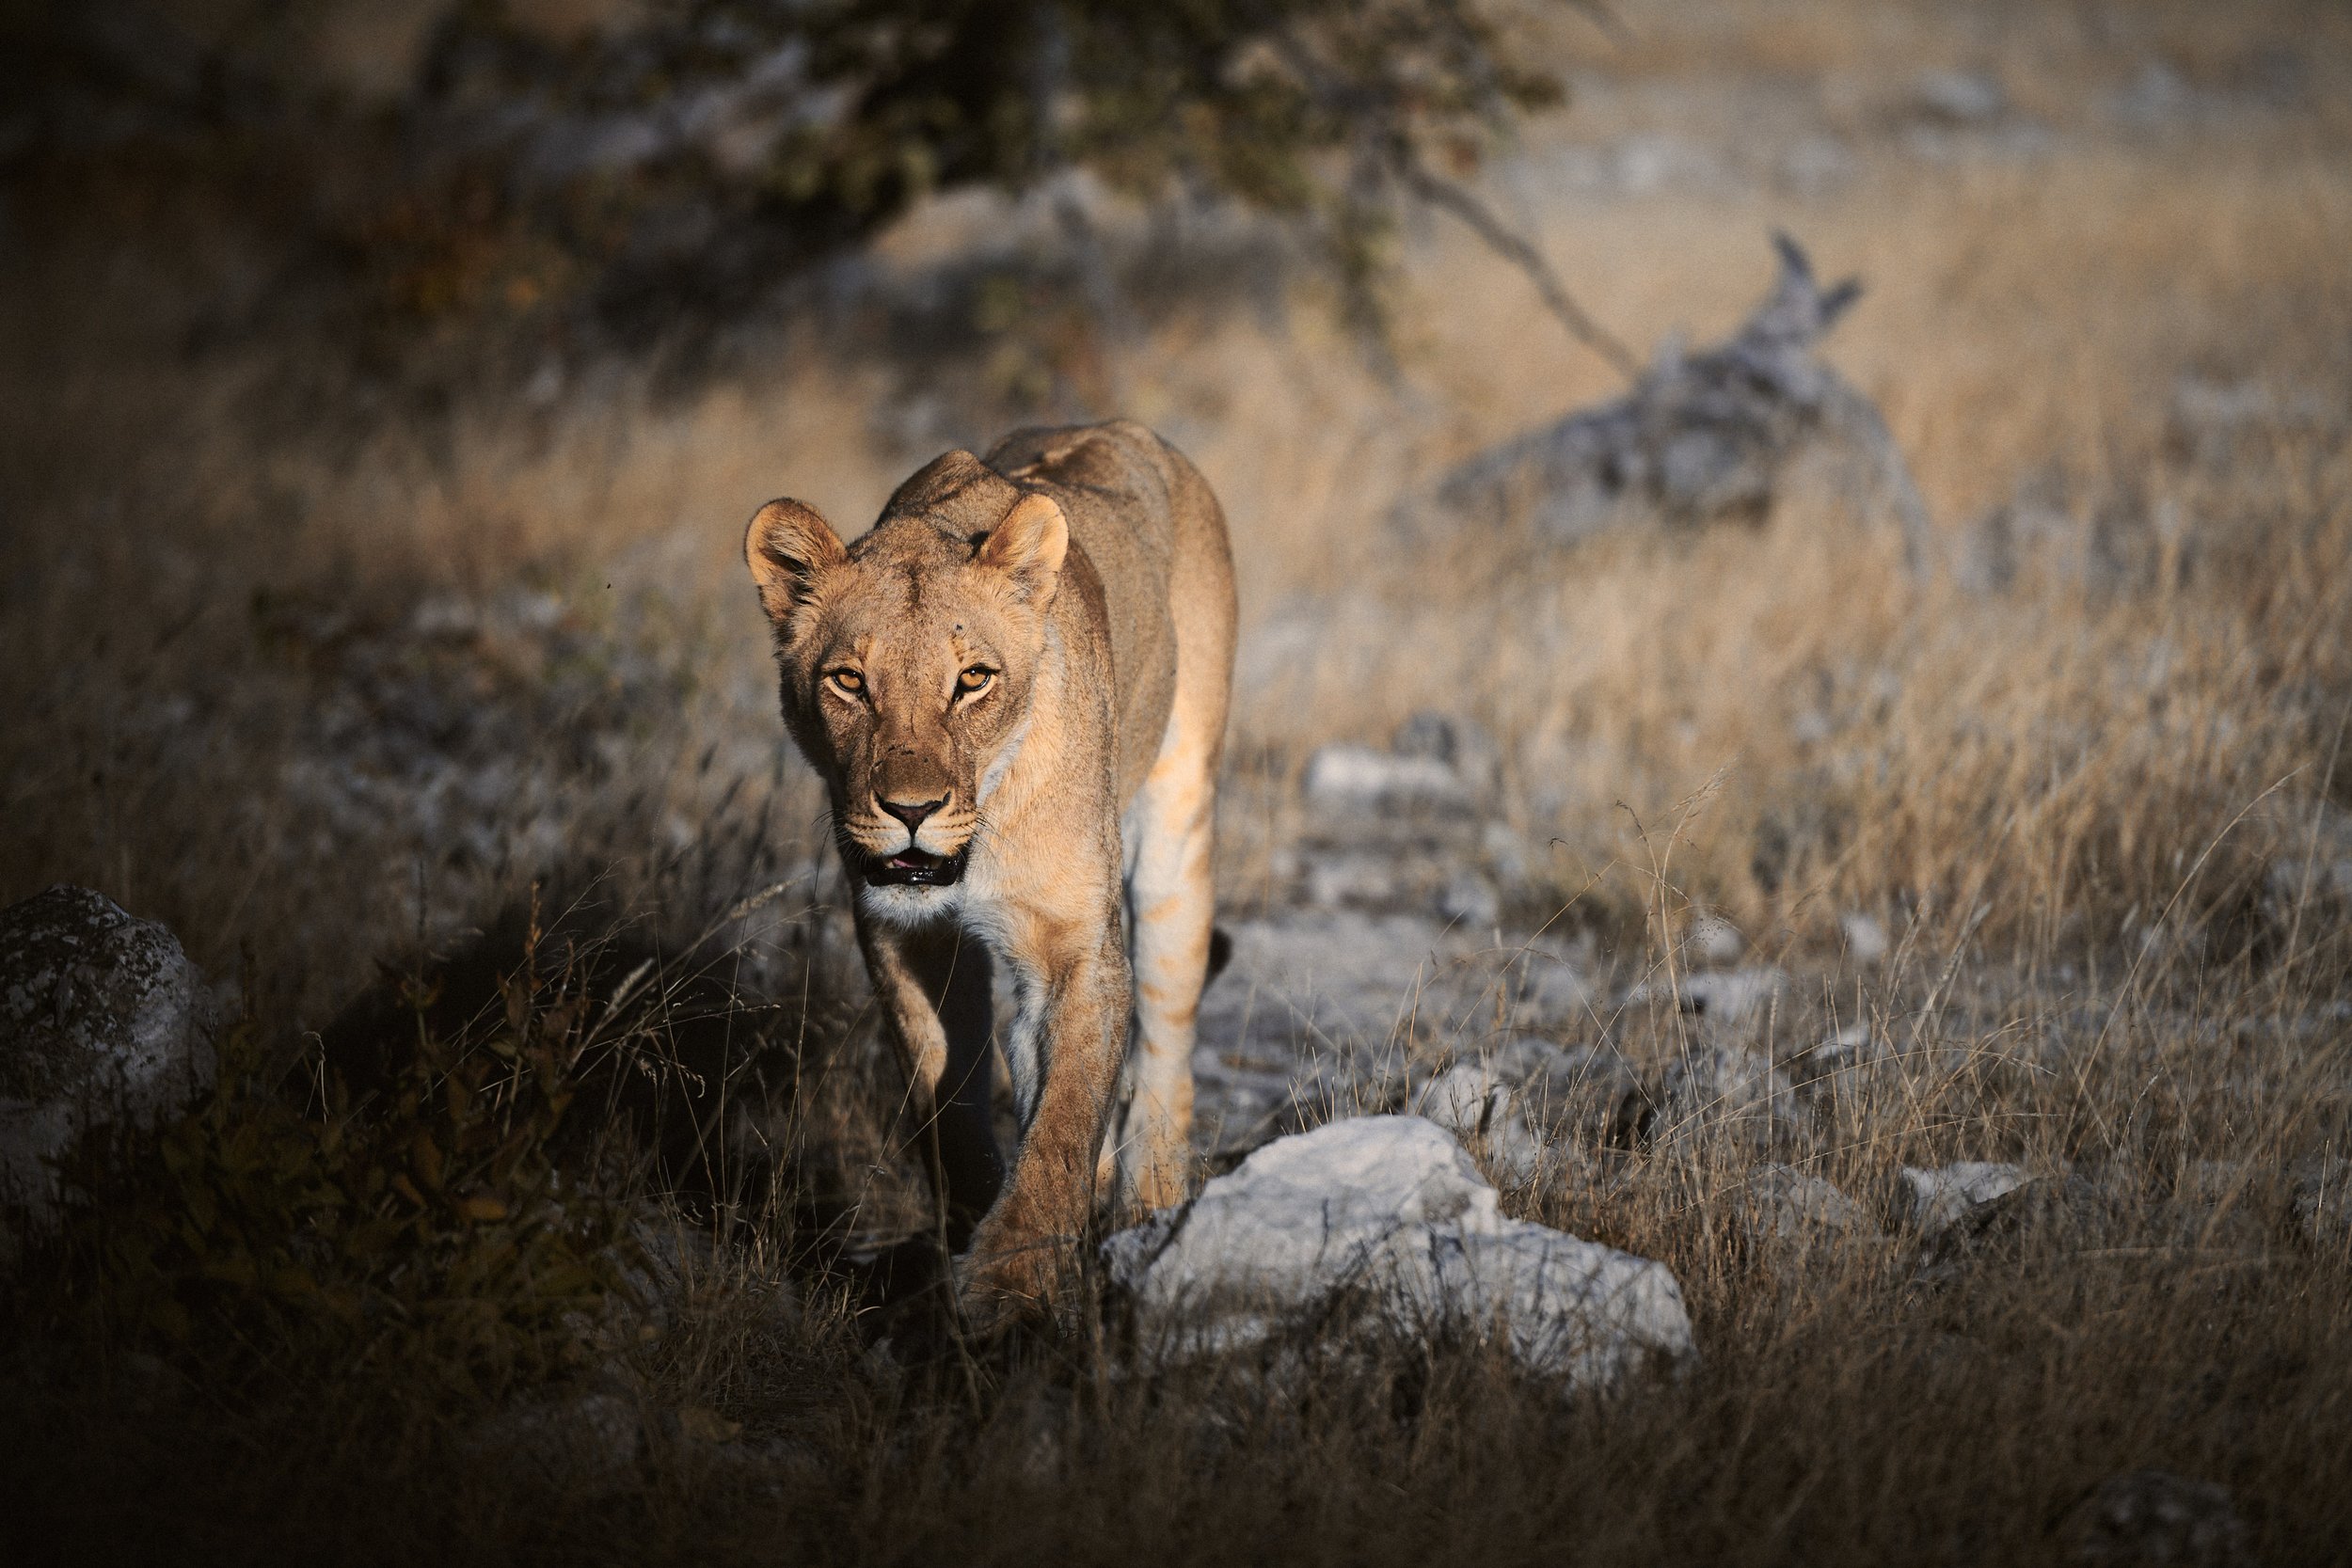
For running mammals like wolves, deer, or big cats, 1/2000s is a good baseline. It freezes their motion while keeping enough detail sharp. I’ve learned this the hard way—one time in Namibia, I had a cheetah dashing past my Land Cruiser, and my shutter was at 1/800s. The result? A series of blurry spots instead of a crisp predator in action. Lesson learned.

Cheetah sprinting in Etosha NP, Namibia.
Walking Animals & Slower Movements
Not everything in wildlife photography is about freezing lightning-fast action. If an animal is walking or making slower movements—like a bear foraging or an elephant strolling—you can drop your shutter speed to around 1/500s to 1/1000s. This allows you to lower your ISO and get a cleaner image while still maintaining sharpness.
For example, on a recent shoot in Zambia I photographed a kudu moving through the golden grass in the fading evening light at 1/320s. It kept it sharp while allowing for a balanced exposure. Had I gone with 1/3200s, I would have needed to crank up my ISO, adding unnecessary noise.

Kudu at dusk in South Luangwa NP, Zambia.
When to Go Lower: Stationary Subjects
When an animal is completely still—like a sleeping lion, a perched owl, or a resting bear—you can go much slower, sometimes even down to 1/100s or lower. But there’s a catch: the longer your focal length, the faster your shutter speed should be to counteract camera shake.
With a 600mm lens, you generally don’t want to go below 1/600s unless you’re using a tripod or have impeccable hand-holding skills. With shorter focal lengths, like a 100mm, you can push it lower, even 1/50s in some cases.
Balancing Shutter Speed with ISO and Aperture
Wildlife photography is all about balancing the exposure triangle. If you need a fast shutter speed but don’t have much light, you have two choices: open up your aperture or raise your ISO.
Aperture: A wide aperture (like f/2.8 or f/4) lets in more light, allowing you to use a higher shutter speed without cranking up the ISO too much. This is great for isolating your subject and blurring the background.
ISO: Sometimes, you have no choice but to increase your ISO. Modern cameras handle ISO 3200 or even 6400quite well, so don’t be afraid to push it when needed. It’s better to have a slightly noisy shot than a blurry one.
A simple rule of thumb: if you’re shooting in low light and your shutter speed is too slow, first open up your aperture. If that’s maxed out, then bump up the ISO.
Wide Apertures (f/2.8 – f/5.6) for Isolation and Bokeh
Most of the time, especially when shooting wildlife portraits, you want to use a wide aperture (low f-number). Something like f/2.8 or f/4 helps separate the subject from the background, giving that creamy bokeh effect photographers love. This is crucial when shooting in dense environments—forests, tall grass, or busy savannahs—where you want to blur out distractions.

Shallow depth of field at 600mm f4
However, be mindful of your depth of field. When shooting a close-up of an eagle at 600mm and f/4, you might end up with only the eye in focus. That’s where fine-tuning comes in—f/5.6 or f/8 can be a sweet spot for maintaining sharpness while still getting a nice blur.
Narrow Apertures (f/8 – f/11) for Group Shots & Environmental Portraits
If you're capturing an animal in its environment you’ll want more depth of field. This is where f/8 to f/11 comes in handy. These settings keep both the animal and part of the background in focus, giving the viewer a sense of place without overwhelming the subject.
Narrower apertures are also useful when photographing multiple animals in the same frame. If you’re shooting a pack of wolves or a group of lions resting together, a narrower aperture ensures all of them stay in focus, rather than just the closest one.

I shot this image at f11 to make sure both the elephant and the mopane trees were in focus.
Best ISO Settings for Wildlife Photography
Ah, ISO - the setting that used to haunt photographers back in the day. If you started out in the early digital era you probably remember cringing at the thought of pushing ISO past 800. Grainy, muddy images were the norm. But today? Modern cameras have changed the game. ISO isn't the enemy anymore; it’s a powerful tool that lets us freeze fast-moving wildlife, shoot in low light, and balance our exposure without worry.
How High Can You Go? Depends on Your Camera
The good news? Most modern cameras can handle high ISO settings really well. But the exact limits depend on what you're shooting with.
Entry-level and mid-range cameras: If you're using a crop-sensor body (like a Canon R7, Nikon D7500, or Sony A6700), you’ll probably get clean results up to ISO 3200 or 6400. Beyond that, noise starts creeping in, but it’s still usable with some noise reduction in post.
High-end full-frame cameras: If you’re shooting with a flagship model like the Canon R1, Nikon Z9, or Sony A1 II you can comfortably push ISO 12,800 or even 20,000 and still get solid files with plenty of detail. With my R3 I can sometimes go as far as 51.200 and still get usable files.
High-resolution cameras (like the Canon R5 or Sony A7R V): These pack a ton of megapixels, which means noise becomes a bit more noticeable. Still, ISO 12,800 is totally usable—especially if you expose correctly and apply noise reduction wisely.
I shot this image on Canon R3 at ISO 20.000
How to Set ISO Based on Your Shutter Speed & Aperture
ISO is all about balancing your exposure triangle. The trick is knowing when to raise it.
Fast-moving subjects (birds in flight, running predators) → You need a high shutter speed (1/2000s or more), which means your ISO will have to compensate, especially in lower light.
Blue hour shots → At dusk or dawn you’ll need to bump ISO up, often past ISO 3200–6400, to keep a usable shutter speed.
Low-light wildlife (forests, nocturnal animals) → This is where full-frame cameras shine. Don’t be afraid to push ISO 6400, 12,800, or higher if needed. Noise is better than motion blur.
Using Auto ISO with Manual Limits
One of the best ways to handle ISO efficiently is by using Auto ISO with manual limits. This lets you focus on adjusting your shutter speed and aperture while letting the camera tweak ISO automatically—within a range you’re comfortable with.
Set a minimum shutter speed (e.g., 1/1000s for wildlife, 1/2500s for birds in flight).
Set a max ISO limit based on your camera’s capabilities (e.g., ISO 6400 for entry-level cameras, ISO 12,800 or more for full-frame models).
Use exposure compensation to fine-tune brightness when needed.
This way, you get the best balance of exposure without worrying about underexposed or blurry shots.
If you want to understand ISO more in depth I suggest you to check this video:
Autofocus Settings for Wildlife Photography
You can have the best camera and the sharpest lens, but if your autofocus settings aren’t dialed in, you’ll end up with a blurry mess instead of a crisp, tack-sharp image of that once-in-a-lifetime moment. Over the years, I’ve tested different autofocus modes in all sorts of conditions—tracking cheetahs at full sprint in Namibia, following an eagle in flight over Patagonia and locking focus on a leopard hidden in the dense brush of South Luangwa. Each scenario requires a slightly different approach, so let’s break it down.
AF-C (Continuous Autofocus) vs. AF-S (Single Autofocus)
One of the biggest mistakes I made early on was relying too much on AF-S (Single Autofocus) for moving subjects. AF-S locks focus on a subject when you half-press the shutter, but if the animal moves even slightly, the focus doesn’t adjust. This works fine for completely stationary animals—like a lion lounging in the shade or an owl perched on a branch—but for anything moving, it’s a disaster. I once missed an entire sequence of a fox hunting in the snow because my camera was stuck in AF-S. Lesson learned.
For wildlife, AF-C (Continuous Autofocus or Servo AF) is the way to go 99% of the time. When set to AF-C your camera continually adjusts focus as long as you keep the shutter half-pressed (or use back-button focus, but we’ll get to that in a bit). This is essential for tracking animals in motion, whether it’s a bird taking off, a wolf running through the forest, or a bear fishing in a river. If you shoot wildlife, just leave your camera in AF-C by default - you won’t regret it.
Best Focus Modes for Wildlife Photography
Single Point AF → For Stationary Animals
If an animal is still, Single Point AF is your best bet. This lets you place the autofocus point exactly where you want - usually on the animal’s eye. I use this when photographing an animal at rest, like a leopard in a tree or a puffin standing on a cliff. The key is to be precise with your focus point. Even slight misplacement - like locking onto the nose instead of the eye—can make your image feel soft.
Dynamic AF / Tracking AF → For Fast-Moving Subjects
For wildlife on the move, Dynamic AF (Nikon) or Tracking AF (Canon/Sony) is a lifesaver. Unlike Single Point AF, which stays fixed, Dynamic AF allows the camera to use nearby focus points if the subject moves slightly. I use this when tracking running, flying, or swimming animals. When a lion charges, or a bird suddenly shifts direction mid-flight, this setting gives you a much better chance of keeping focus locked.
Eye-Detection AF → When Available for Animal Subjects
Not all cameras have Animal Eye AF, but if yours does, use it! Modern mirrorless cameras from Sony, Canon, and Nikon have AI-powered Eye-Detection AF for animals and it’s a game-changer. Instead of worrying about manually selecting the focus point, the camera automatically locks onto the eye, even if the animal moves slightly. This works best in good light and with clear visibility of the eye, but when it works, it’s pure magic.
How to Set Up Back-Button Focus for Better Control
If you haven’t tried Back-Button Focus (BBF) yet, do it. This technique separates autofocus from the shutter button, giving you better control. Instead of half-pressing the shutter to focus, you assign autofocus to a button on the back of the camera—usually the AF-ON button. This lets you:
✔️ Hold focus on a subject even if you recompose the shot
✔️ Prevent accidental refocusing when pressing the shutter
✔️ Quickly switch between AF-C and manual focus by simply releasing the button
Setting it up varies by camera, but here’s the basic process:
Go to your custom settings menu and find the "AF Activation" or "Shutter/AF-ON" setting.
Disable autofocus from the shutter button (this stops AF from activating when you press the shutter).
Assign AF-ON button to autofocus activation.
Once you get used to BBF, you won’t go back. It’s especially useful for situations where you want to lock focus on an animal, recompose, and shoot without refocusing—perfect for framing wildlife creatively without losing sharpness.
Best Shooting Modes for Wildlife Photography
When you’re out in the field, trying to capture a perfectly sharp image of a lion mid-yawn or an eagle in flight, the last thing you want is for your camera settings to work against you. The shooting mode you choose can make or break your wildlife shots. Many beginners assume that Aperture Priority (Av or A mode) or Shutter Priority (Tv or S mode) are good choices, but both have major flaws when it comes to fast-moving wildlife. The best approach? Full Manual Mode with Auto ISO. Let’s break it down.
Why Aperture Priority Isn’t Ideal
Aperture Priority mode lets you control the aperture (f-stop) while the camera automatically adjusts the shutter speed to maintain proper exposure. In theory, this sounds great, especially if you want to control depth of field (DOF). For example, if you want to blur the background of a portrait-style shot of a cheetah, you might choose f/2.8 or f/4 and the camera will pick an appropriate shutter speed.
But here’s the problem: Wildlife is unpredictable. If a change in lighting conditions trigger your camera to suddenly drops the shutter speed too low, your fast-moving subject will be blurry. A running antelope or a flying bird requires a shutter speed of at least 1/2000s or faster, but in Aperture Priority mode, depending on the light, the camera might select 1/500s or lower, leaving you with motion blur. And sure, you can set a minimum shutter speed in some cameras, but it’s not a perfect solution - it still removes full control from you, which isn’t ideal for action photography.
Why Shutter Priority Falls Short
Shutter Priority mode flips the control - you select the shutter speed and the camera picks the aperture to balance exposure. This seems like a great idea for wildlife because you can lock in 1/2500s for birds in flight or 1/1000s for a walking elephant. No motion blur, right?
The problem is that you lose control over aperture, which is a huge issue for wildlife photography. The aperture dictates depth of field, which affects how much of your subject is in focus. If the camera decides to use f/16, you might get a busy, distracting background. If it picks f/2.8, your subject might not be entirely in focus—especially if it has long features like a bird’s beak or an animal’s horns.
You don’t want to leave aperture up to chance. That’s why Manual Mode is the best solution.
Why Manual Mode + Auto ISO is the Best
In Manual Mode, you take full control of both shutter speed and aperture, ensuring that neither changes unexpectedly.
Shutter speed: Set this based on your subject’s motion. Use 1/1000s for walking animals, 1/2000s–1/4000s for birds in flight, and 1/500s for slow-moving subjects.
Aperture: Choose based on how much of your subject you want in focus. Use f/4 or f/5.6 for isolating animals from the background and f/8–f/11 for groups or detailed shots.
But what about exposure? That’s where Auto ISO comes in.
How Auto ISO Works & Why It’s Essential
ISO controls the camera’s sensor sensitivity to light, and instead of manually adjusting it every time the light changes, Auto ISO allows the camera to do it for you while keeping your exposure balanced. This means you don’t have to worry about tweaking ISO while tracking a running cheetah or waiting for a leopard to emerge from the shadows.
Most modern cameras let you set a maximum ISO limit (e.g., ISO 6400 or 12,800) to prevent excessive noise.
With this setup, you retain control over motion sharpness (shutter speed) and depth of field (aperture), while allowing the camera to handle exposure adjustments automatically with ISO. It’s the best of both worlds.

When light is even through the frame evaluative (or matrix mode) works perfectly.
Using Manual Mode + Auto ISO for Exposure Control
One of the best tricks I’ve picked up over the years is using Manual mode with Auto ISO and controlling the exposure with exposure compensation. Here’s how it works:
In Manual mode you set your shutter speed (to freeze motion) and aperture (to control depth of field).
Auto ISO adjusts automatically based on the light conditions, so you’re not constantly fiddling with settings when an animal moves from sunlight to shade.
Exposure compensation (+/-EV) lets you override the camera’s automatic adjustments to brighten or darken the image as needed.
For example, if I’m photographing a dark-furred bear against a snowy background, the camera might underexpose the image because it sees all that bright snow. I’d dial in +1 or +2 EV to compensate. The opposite happens when shooting a bright white bird against a dark background—I’d reduce exposure compensation to avoid blowing out the highlights on the bird.
This method gives me full control while letting the camera handle the tricky, fast-changing lighting situations.
Daylight vs Cloudy WB → Adjusting for Warm or Cool Tones
While these days AUTO White Balance works for most situations, I often use specific white balance presets to keep colors consistent. Daylight WB (usually around 5200K) works well in bright sun, giving a natural, balanced look without overcompensating. But if I want to enhance warmth—like during sunrise or sunset—I switch to Cloudy WB (6000K–6500K). This makes golden tones pop without looking unnatural.
On the flip side, if I’m in snowy conditions (like photographing ibex in the Alps), I sometimes dial my WB slightly cooler to keep the whites crisp and prevent them from looking too warm. That’s the beauty of manual white balance - tiny tweaks can make a big difference.
Why Shooting in RAW Gives More Flexibility for Color Correction
Now, let’s talk RAW vs JPEG—because this is where color really comes into play.
When you shoot in RAW your camera captures all the data from the sensor without applying compression. This means if your white balance is slightly off, you can adjust it later in post-processing without any loss in quality. If you shoot in JPEG? You’re stuck with whatever WB the camera decided at the moment of capture.
Pros and Cons of RAW vs JPEG

If you're serious about wildlife photography, RAW is the way to go—especially for controlling white balance and color accuracy. The only real downside? You will need to spend time editing. But for me, that’s a small price to pay for perfect colors and more creative control.
Pro Tips for Adjusting Settings in the Field
Nature doesn’t wait for you to fiddle with your settings. The best moments happen in an instant and if you’re not prepared to adjust fast you’re going to miss the shot. Here’s how to stay ahead of the curve when conditions change in the field.
How to Quickly Adjust Settings Based on Changing Light
Light changes fast, especially at dawn and dusk. One moment, you’ve got perfect golden-hour glow, and the next, the sun dips behind a cloud, throwing your scene into shadow. If you’re not ready, you’ll either underexpose your shot or end up with a noisy mess from cranking ISO too late.
As we’ve seen ISO Auto with a max limit can save you when light changes mid-shot; you just have to keep an eye on your shutter speed and aperture, adjusting settings as light condition changes, and let the camera handle the rest.
Using Custom User Modes (C1, C2, C3 in Canon) for Quick Recall
Every wildlife photographer should be using custom user modes. If you’re not, you’re leaving speed on the table. Most modern cameras let you pre-program custom settings under C1, C2, and C3 (Canon) or U1, U2, U3 (Nikon). Think of these as instant presets for different scenarios.
For example, I use:
C1: Fast-moving wildlife (1/3200s, f/5.6, Auto ISO, Tracking Autofocus) – perfect for birds in flight or running predators.
C2: Low-light wildlife (1/200s, f/4, Auto ISO, Single Point Autofocus) – for dawn/dusk moments when every bit of light matters.
C3: General mammal subjects (1/800s, f/4, Auto ISO, Tracking Autofocus with eye detection) – for portraits of resting animals where sharpness is key.
With one flick of a dial I can instantly swap between settings, instead of frantically adjusting exposure, autofocus, or drive mode. It’s a lifesaver when the action shifts fast!
Burst Mode & Silent Shooting → Capturing Multiple Frames Discreetly
Wildlife rarely poses for you. That’s why burst mode is a must - but knowing when to use it is just as important. I shoot in continuous high (15+ fps) for fast action and I switch to silent burst (or electronic shutter) when dealing with skittish subjects. Some birds can react to the shutter sound, so silent mode helps get natural behavior instead of a startled reaction.
Important tip: Don’t just hold down the shutter and pray. Unless some real action is happening use short bursts of 3-5 shots to avoid filling your card with duplicates. Look for peak action—wings at full extension, an animal’s eyes perfectly sharp - and time your bursts accordingly.
Using a Tripod vs Handheld Techniques for Stabilization
Tripods are great but in fast-paced wildlife photography they can be kinda limiting. I almost only use a tripod when I’m shooting from a photographic hide.
For everything else, I prefer handheld shooting with proper technique:
Tuck your elbows in and brace against your body for stability.
Use your left hand under the lens to control movement.
Lean against trees, rocks, or kneel down to reduce camera shake.
Often the safari vehicle provides a perfect shooting support, but turn off the engine to avoid vibrations.

Download My Complete Wildlife Photography Guide for Beginners
If you’re just getting started with wildlife photography, you probably have a million questions. I remember struggling with all of these things when I first picked up my camera and I know it can feel overwhelming. That’s exactly why I put together my Complete Wildlife Photography Guide for Beginners—a 100-page resource designed to give you clear, actionable advice so you can start capturing stunning wildlife images right away.
Ready to take your wildlife photography to the next level? Sign up now and grab your free copy!
Join One of My Workshops – The Best Way to Learn Photography
There’s only so much you can learn from blog articles and YouTube videos. Trust me, I tried. But the real game-changer? Hands-on experience in the field. There’s no substitute for being out in nature, camera in hand, with an experienced mentor guiding you through the challenges of wildlife photography in real time. That’s why my in-person photography workshops are designed to give you practical experience in breathtaking locations where you’ll refine your skills, get immediate feedback, and capture portfolio-worthy shots.
I run workshops in some of the world’s most stunning wildlife destinations, from Namibia and Botswana to Patagonia and the Italian Alps. These aren’t just tours; they’re immersive learning experiences designed to push your skills to the next level.
If you’re serious about improving your wildlife photography, join one of my workshops. It might just be the best investment you ever make in your photography journey.


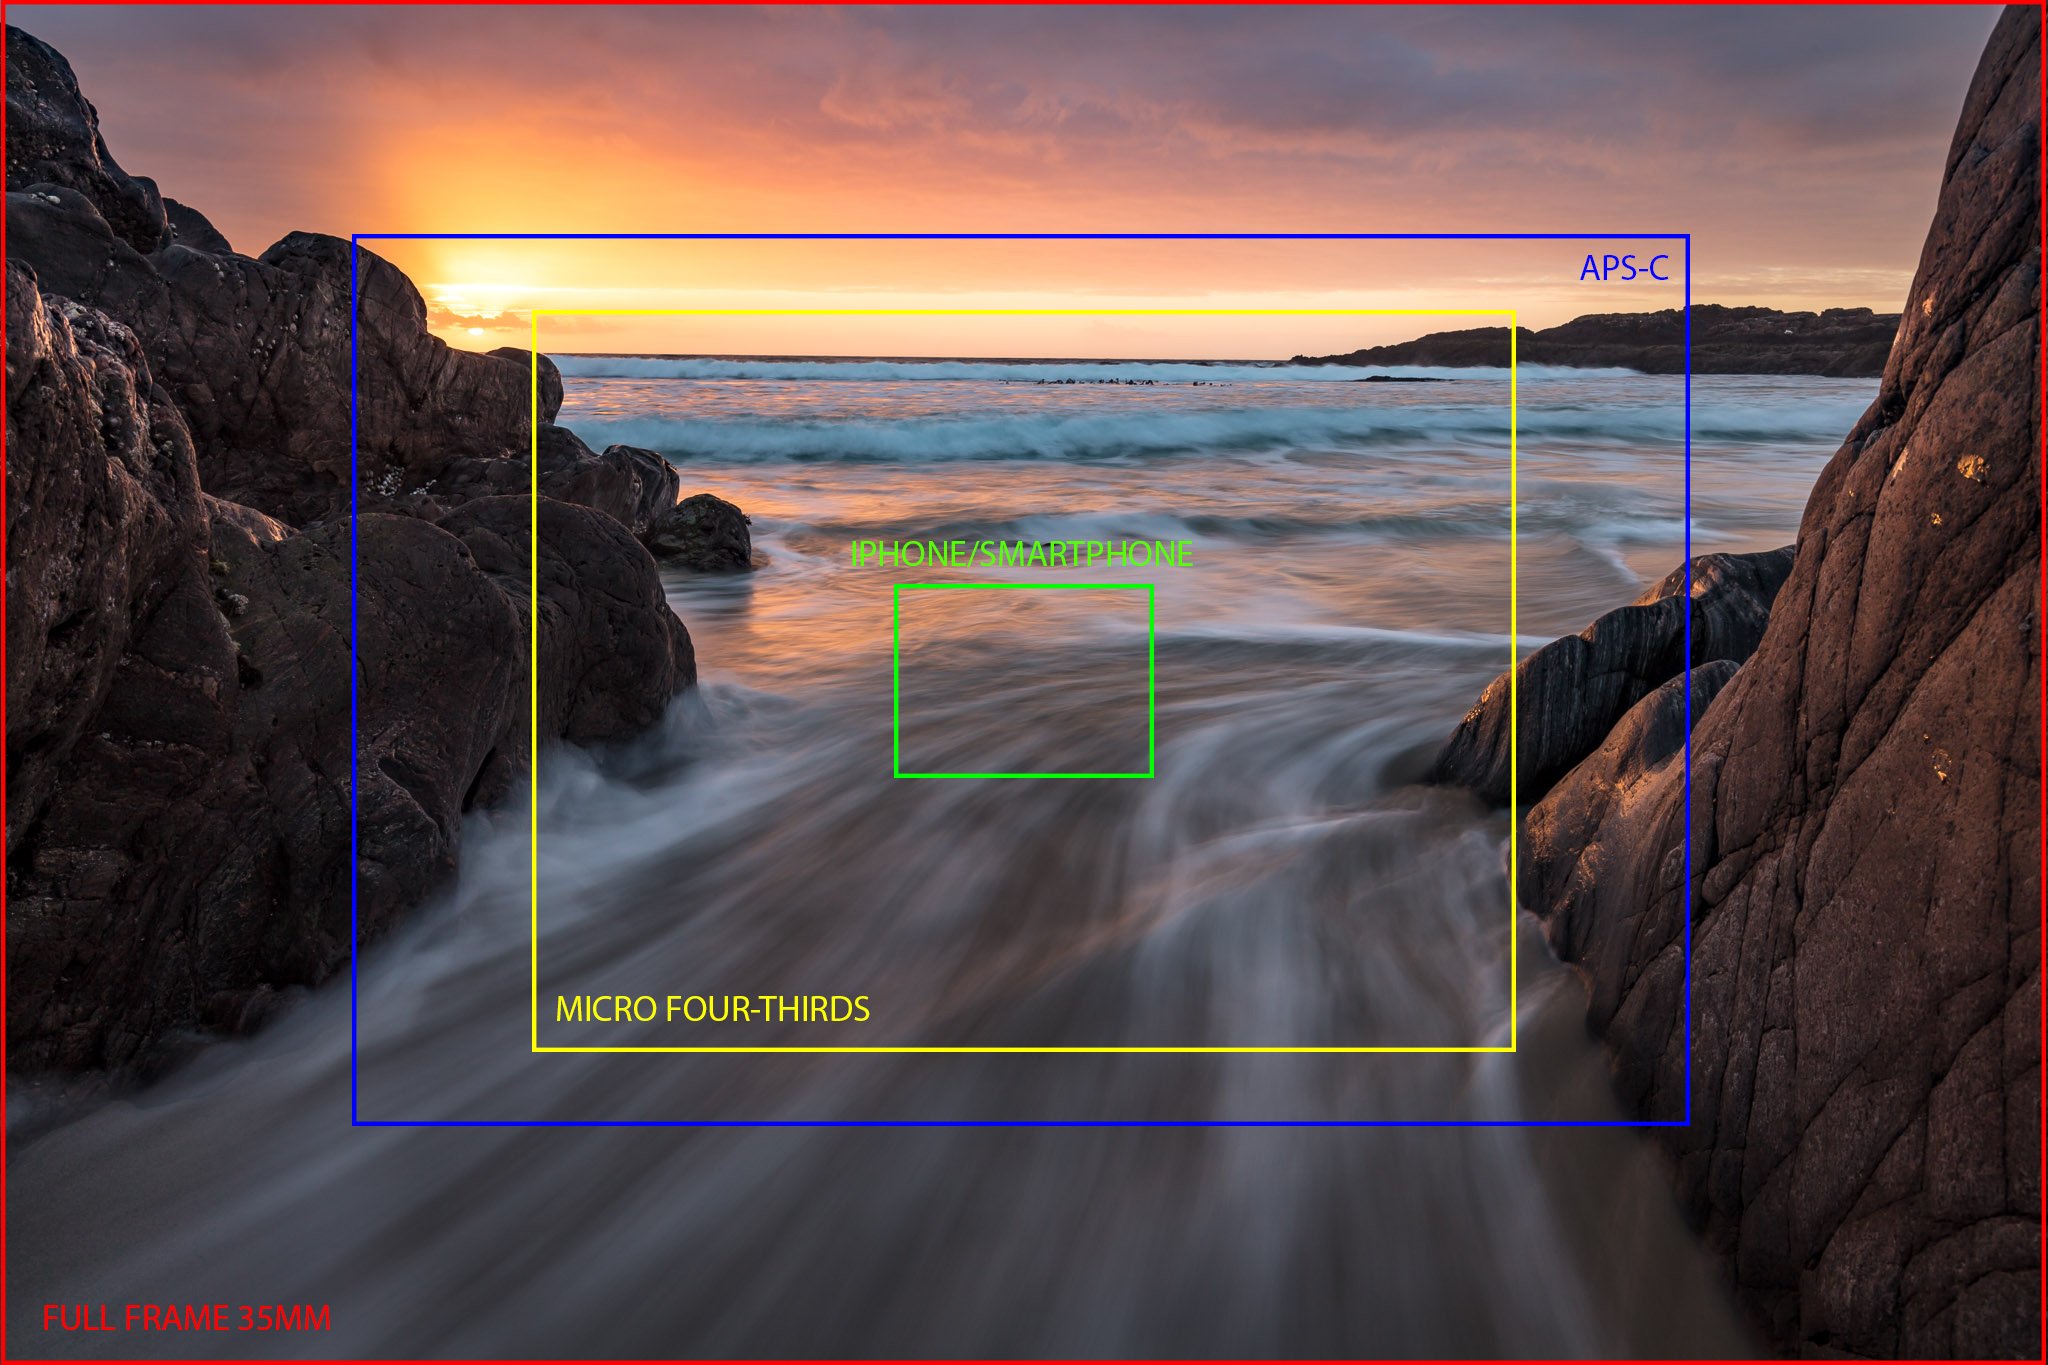
Full-Frame vs Crop Sensor for Wildlife Photography: Which One is Best for You?
Wildlife photography demands the right gear; what camera should I choose? What lens should I bring?
One of the biggest debates is full-frame vs crop sensor cameras. Which one is better for capturing fast-moving animals and render images in the best way? Some swear by the better low-light performance and dynamic range of full-frame cameras, while others prefer the extra reach and affordability of crop sensors. But which is truly the best for you? Let’s break down the key differences to help you make an informed decision!
Understanding Sensor Size in Wildlife Photography
What is a Full-Frame Sensor?
A full-frame sensor is a digital camera sensor that matches the size of 35mm film - 36mm x 24mm. It gets its name from the fact that early digital cameras had smaller sensors, so when manufacturers released one with the same size as classic film, they called it "full-frame."
A full-frame sensor has larger individual pixels, which help capture more light, improving performance in low-light conditions. This results in better image quality, higher dynamic range, and reduced noise at high ISO settings, making full-frame cameras a popular choice for wildlife and landscape photographers.
What is a Crop Sensor? (APS-C, Micro Four Thirds)
A crop sensor is any sensor smaller than full-frame. The two most common types in wildlife photography are APS-C (roughly 22mm x 15mm, depending on the brand) and Micro Four Thirds (17mm x 13mm). These sensors crop the field of view compared to full-frame, which means they provide an apparent magnification effect on lenses - a key advantage for wildlife photography.
Crop sensors are popular among entry-level and enthusiast wildlife photographers because they are cheaper, lighter, and offer extended reach. For example, an APS-C sensor with a 1.5x or 1.6x crop factor makes a 300mm lens behave like a 450mm or 480mm lens, getting you closer to distant wildlife without spending thousands on super-telephoto lenses.

How Sensor Size Impacts Image Quality, Depth of Field, and Low-Light Performance
Sensor size affects image quality in several ways:
Larger sensors (full-frame) generally capture more light per pixel, improving dynamic range and low-light performance. This means cleaner images at high ISO and better detail in shadows and highlights.
Smaller sensors (crop sensors) introduce more noise at high ISO due to smaller pixels, but they increase depth of field, which can be beneficial for certain wildlife shots where you need more of your subject in focus.
If you often shoot in low light (dawn, dusk, or dense forests), full-frame has a clear advantage. However, if reach and portability are your top priorities, a crop sensor might be the smarter choice.

Shooting with canon R5 in Sossusvlei, Namibia
The Crop Factor Explained and How It Affects Focal Length
The crop factor refers to how a smaller sensor crops the field of view compared to full-frame. APS-C sensors typically have a 1.5x crop factor (Nikon, Sony) or 1.6x (Canon), while Micro Four Thirds has a 2x crop factor.
For wildlife photographers, this means a 400mm lens on a Canon APS-C camera (1.6x crop) gives an effective focal length of 640mm. This is a huge advantage when photographing distant animals, as it gives more reach without needing a longer (and more expensive) lens.
However, the crop factor doesn’t increase actual optical magnification—it just narrows the field of view, which can sometimes make composing shots a bit tricky.
Pros and Cons of Full-Frame Sensors for Wildlife Photography
Advantages of Full-Frame Sensors
✅ Better Low-Light Performance – Larger pixels capture more light, leading to less noise and better detail at high ISO. Essential for early morning or twilight wildlife shots.
✅ Higher Dynamic Range – Full-frame sensors handle high-contrast scenes better, retaining details in both bright highlights and deep shadows.
✅ Shallower Depth of Field – Using a longer lens to get the same magnification helps to create a more natural background blur (bokeh), helping isolate subjects from busy backgrounds.
✅ Better Image Quality at High ISO – A must-have for night safaris or dense forests, where high ISO settings (3200-12800) are often needed.
Disadvantages of Full-Frame Sensors
❌ More Expensive – Full-frame cameras cost more upfront, and their lenses are also more expensive.
❌ Larger & Heavier – Carrying a full-frame setup with a 600mm lens on a long trek is no joke. Heavier gear can be tiring, especially for handheld shooting.
❌ Less Effective Telephoto Reach – A 500mm lens on a full-frame camera is just 500mm, whereas on an APS-C crop sensor, it effectively acts like 750mm. If reach matters, crop sensors have the edge.

Alpine wildlife safari with a Canon R3 and 600mm f4.
Pros and Cons of Crop Sensors for Wildlife Photography
Advantages of Crop Sensors
✅ Extra Reach with Crop Factor – A 1.5x or 1.6x crop factor makes a 300mm lens act like 450mm or more, perfect for distant wildlife shots.
✅ More Affordable – Crop sensor cameras and lenses are cheaper, making them ideal for beginners and those on a budget.
✅ Lighter and More Compact – Perfect for hiking, travel, and handheld shooting. A crop sensor body with a 100-400mm lens is far easier to carry than a full-frame with a 600mm prime.
✅ More Depth of Field – More of the subject remains in focus, which can be useful when photographing fast-moving animals.
Disadvantages of Crop Sensors
❌ Lower Low-Light Performance – Smaller pixels struggle in dim conditions, leading to more noise at ISO 6400+.
❌ Reduced Dynamic Range – Shadows and highlights clip more easily, making it harder to recover details in high-contrast scenes.
❌ Limited Lens Selection – Many pro wildlife lenses are designed for full-frame, so crop shooters have fewer options for high-end glass.
Key Considerations When Choosing Between Full-Frame and Crop Sensor
📌 Budget: Full-frame costs more, but offers better image quality. Crop sensors are affordable and great for reach.
📌 Shooting Style: If you shoot low-light or high-contrast environments, full-frame is better. If you need extra reach, crop sensors win.
📌 Portability Needs: Traveling or hiking? Crop sensor setups are usually lighter and easier to carry.
📌 Future Goals: If you plan to go pro, investing in full-frame early may be the best move.
All of this said, I’ve been shooting with several different cameras, both full frame and aps-c, over the years. In my opinion, full frame is always the winner. The only disadvantage, if we can call it like that, is that we need a longer focal length to fill the frame. This might also be seen as an advantage, as the compression of longer lenses looks much better than just “cropping in” as we do with aps-c sensors.
Final Verdict – Which One Should You Choose?
🔹 If you need the absolute best image quality, dynamic range, and low-light performance → go Full-Frame.
🔹 If budget, extra telephoto reach, and portability matter more → go Crop Sensor.
🔹 If you want to build your setup over time, consider getting a Crop Sensor camera paired with full frame lenses. This will allow you to build your lens collection and, when you will be ready, you can upgrade your camera body to a full frame one.
Ready to Take Your Wildlife Photography Further?
Put these techniques into action on an unforgettable adventure! Join me on one of my guided wildlife photography workshops or safari trips to Namibia, Botswana, Zambia and other incredible destinations worldwide.
You’ll receive personalized instruction, visit spectacular wildlife hotspots, and dramatically improve your photography in a once-in-a-lifetime adventure.
![Master Low-Light Photography [video tutorial]](https://images.squarespace-cdn.com/content/v1/5b6af1cd5417fcbf0a92bc2e/cd397a66-2e37-42ac-bbec-f2ddbfb37b31/24-10-02_SARTORI_8912.jpg)
Master Low-Light Photography [video tutorial]
Have you ever faced the frustration of shooting in low light, only to find your photos ruined by noise or lack of detail? Whether it’s wildlife at dusk, action shots in dim environments, or nighttime landscapes, low-light conditions can push even the best photographers to their limits.
Have you ever faced the frustration of shooting in low light, only to find your photos ruined by noise or lack of detail? Whether it’s wildlife at dusk, action shots in dim environments, or nighttime landscapes, low-light conditions can push even the best photographers to their limits.
In this video I break down practical tips and tricks to tackle low-light challenges and capture stunning images, even at high ISO settings.

Here's what you'll learn:
🌌 Why noise isn't just about ISO—and how to manage it effectively.
🌌 How to balance shutter speed, aperture, and ISO for the best results.
🌌 Techniques for stabilizing your camera to maximize light capture.
🌌 Real-world examples, including how I shot a clean photo at ISO 12800.
🌌 Pro strategies for testing and understanding your camera’s low-light limits.
Check it out!


Struggling to Get Sharp Photos? Watch This!
Tired of soft or blurry photos? Master sharpness with pro tips on settings, tripod techniques, and freezing motion. Learn how to balance technical precision with artistic storytelling.

Have you ever returned from an incredible photography session excited to review your shots, only to find that they’re soft or blurry? It’s a frustrating experience every photographer has faced at some point. But don’t worry—sharp photos aren’t just about having expensive gear; it’s about understanding and applying the right techniques.
In this video I dive deep into the common mistakes that lead to blurry images and share actionable tips to ensure you capture tack-sharp photos every time.
Here's a sneak peek of what you'll learn:
📸 The importance of shutter speed and how it affects sharpness.
📸 How to freeze motion with the right settings.
📸 Why aperture and ISO settings impact sharpness—and how to optimize them.
📸 Pro tips for using a tripod effectively, even in challenging conditions.
And finally, I remind you why sharpness, while important, isn’t everything. Crafting an engaging image goes beyond technical perfection!

Ultimate Photography Guide to Etosha National Park
Etosha National Park is one of Africa's premier wildlife destinations and a paradise for photographers. It’s unique landscape and environment create unique challenges for the photographer, but once I learnt how to approach it it became one of my favorite destinations in the world for wildlife.
Etosha National Park is one of Africa's premier wildlife destinations and a paradise for photographers. It’s unique landscape and environment create unique challenges for the photographer, but once I learnt how to approach it it became one of my favorite destinations in the world for wildlife.
Located in northern Namibia, this iconic park spans over 22,000 square kilometers and is centered around the vast, shimmering Etosha Pan. While you can forget about photographing all the big 5 - there is no buffalos in the park - the vast plains and abundant populations of elephants, lions and rhinos will provide you all the ingredients for amazing photos.

Elephant heard heading to a waterhole near Namutoni camp, Etosha
Exploring Etosha: Inside the Park
Inside the Etosha there are five main camps, each offering unique advantages for exploring the park’s diverse habitats and wildlife. These camps offer the best access as you can be out in the park as soon as the gates open in the morning, while if you stay out of the park you will need to go though the park receptions every time.

Waterhole scene close to Dolomite Camp
1. Dolomite Camp
Located in the western section of Etosha, Dolomite Camp is the only accommodation in this remote area, which is less crowded than the rest of the park. Its elevated position provides stunning panoramic views, and the area is rich in wildlife like black rhinos, lions, and Hartmann's mountain zebras. However, in my experience wildlife on this side of the park tend to be a bit more sparse and the ticker vegetation makes it more difficult to get clean photos.
2. Olifantsrus Camp
This eco-friendly camp is perfect for budget-conscious travelers and features a unique elevated hide overlooking a waterhole, making it ideal for photographers wanting close-up shots of elephants, giraffes, and other wildlife. While the elevated hide is perfect for wildlife watching, the elevated perspective is not the best for photography. There is also a lower-level hide with windows, that would provide a great option but the windows are always so dirty that it’s impossible to photograph through them. Also note that there are no rooms here so the accommodation is only suitable for campers, roof tents or ground tents.

Herds of elephants are moving across the whole park. Here is one at sunset at Olifantsrus Camp.
3. Okaukuejo Camp

Night scene at Okaukejo waterhole
The most popular camp in Etosha, Okaukejo provides the best facilities you’ll find in the park. Thanks to its floodlit waterhole, after dark, you can get incredible sightings of rhinos, lions, and elephants gathering around the waterhole. The area surrounding the camp is very rich in wildlife, but it’s very vast. I suggest booking one of the morning game drives, that are allowed to leave the camp before sunrise. This is your best chance to find a lion before the sun comes, so that you are ready to photograph it with the first light of the day.
All of that being said, Okaukejo is also the busiest camp in Etosha and in peak season can be incredibly crowded. Make sure you book well in advance as it fulls up months or even years in advance.
Wildebeest at sunrise in the Okaukejo area
4. Halali Camp
My favorite camp in Etosha, the place where I had some of the most amazing encounters. In this area I’ve seen everything, from big lion prides to leopards, rhinos and even some cheetah hunts. Centrally located, Halali offers access to some of the park's best waterholes, like Goas and Rietfontein. The camp itself has a waterhole that attracts a variety of animals, with a high point of view that makes you feel like there with the wildlife. Halali facilities are not in the best conditions and some heaving maintenance and renovations are required.

A leopard we spotted near Halali camp

Waterhole at Halali camp

Etosha also host abundant birds populations. Here is an egyptian goose I photographed at Goas, near Halali
5. Namutoni Camp
Situated in the east, Namutoni is known for its historical fort and proximity to key waterholes like Klein Namutoni and Chudop. This side of the park might be the absolute best for photography, thanks to less vegetation and more open fields. Like in the other camps, if you can get on the morning guided game drive to increase your chances of success.

Open areas around Namutoni provide amazing wildlife photo opportunities
Lodges Outside Etosha
While the camps within the park offer the best accessibility, they come with some compromise on comfort and experience; being all managed by NWR, all the facilities and services inside the park are rather expensive while the quality is very low. For those seeking more luxurious or private accommodations, the lodges outside the park are excellent options:
King Nehale Lodge: Located near the King Nehale Gate, in the north.east of the park, this lodge offers modern amenities and easy access to the park's northern areas. Guests also have access to a private water hole with hide where it’s possible to spend the afternoon waiting for rhinos and lions to came by.
Onguma Game Reserve: Adjacent to the Von Lindequist Gate, Onguma features several luxury lodges and hides for photographers looking for high-end comfort and unique perspectives.
Etosha Village: Situated near the Anderson Gate, this lodge combines convenience with a touch of luxury.
What camera gear should you bring to Etosha?
Compared to other safari destinations, Etosha’s wide open plains require a bit more reach than usual. I would recommend a minimum of 500mm, or even more if possible. There is a lot of light here; you must be back at camp before sunset and you can only leave after sunrise, so don’t worry too much on having a super fast prime lens. Something like a 100-500mm or a 200-600mm are perfect.
If you can, bring a camera with a telephoto in the 100-500 range and a second camera with a 600mm, maybe with a teleconverter. This way you can always get a wider shot with the zoom lens, then switch to your longer prime to get intimate portraits.
Remember to bring some extra batteries and all you need to keep your camera and lenses clean from all the dust that’s constantly floating in the air in the park. You won’t need a tripod as you will be mainly shooting from vehicles.

You need some long telephoto lenses for a safari to Etosha
Clothing and Extra Gear to Bring
Etosha's climate can be extreme, so pack accordingly:
Clothing: Light, breathable fabrics for the day, warm layers for early mornings and evenings (it gets quite chilly in the morning drives so always get a warm jacket). Make sure you use neutral colors to blend into the environment; avoid white or very bright colors.
Hat and sunglasses: A wide brimmed hat and some good sunglasses are essential for sun protection.
Binoculars: Some good binoculars will help a lot when it comes to spotting distant wildlife.
Sunscreen and insect repellent: Both are vital for a comfortable safari experience.
Water bottle: You will need a lot of water during the hot days in Etosha. Make sure you get a personal, reusable water bottle, and buy a few 5L water tanks. Budget at least 3 liters per person per day.
Wildlife in Etosha
Etosha National Park is home to an incredible variety of mammals, offering photographers a chance to capture iconic species in their natural habitat. Here's a closer look at some of the most remarkable mammals you can encounter.
Elephants
Etosha has a very big elephant population. These gentle giants can often be found at waterholes, providing dramatic photo opportunities as they bathe, drink, or interact with each other, or in big herds crossing the plains an grasslands. Their dust-bathing rituals at sunset create mesmerizing silhouettes against the golden light.

Herd of elephants crossing the Etosha plains
Lions
With a population of around 400 individuals, lions are frequently spotted throughout the park, particularly near waterholes during the dry season. Their behavior—whether hunting, resting in the shade, or socializing in prides—offers endless moments to capture powerful and intimate scenes.

Two male lions taking in the first rays of sun in the Halali area
Rhinos
Etosha is a stronghold for both black and white rhinos, making it one of the best places in Africa to photograph these critically endangered species. Black rhinos are more common and can be seen at night around floodlit waterholes, while white rhinos are occasionally spotted in the park’s southern regions.

Black rhino at sunrise near Halali
Leopards
On of the most difficult species to be spotter in Etosha, Leopards are elusive and require patience to photograph, but the reward is worth it. Look for them lounging in trees or near densely vegetated waterholes. Their striking patterns and piercing eyes make for breathtaking portraits.

Leopards are some of the most difficult animals to spot in Etosha
Cheetahs
Etosha’s open plains are ideal habitats for cheetahs, the world’s fastest land animals. They are often seen scanning the savanna from termite mounds or resting in the shade after a hunt. Capturing a cheetah mid-sprint requires planning and lot of patience, plus a fast shutter speed, making it a difficult challenge for any wildlife photographer.

Etosha is one of the best destinations to see cheetahs

Cheetah on the hunt
Giraffes
Giraffes grace the landscape with their elegance, often creating iconic silhouettes against the horizon. Their interactions, whether drinking at waterholes or engaging in "necking" battles, offer unique opportunities to photograph their behavior and long, graceful forms.

Sometimes wildlife gets so close that we can experiment with different types of photography, like here with a giraffe
Zebras
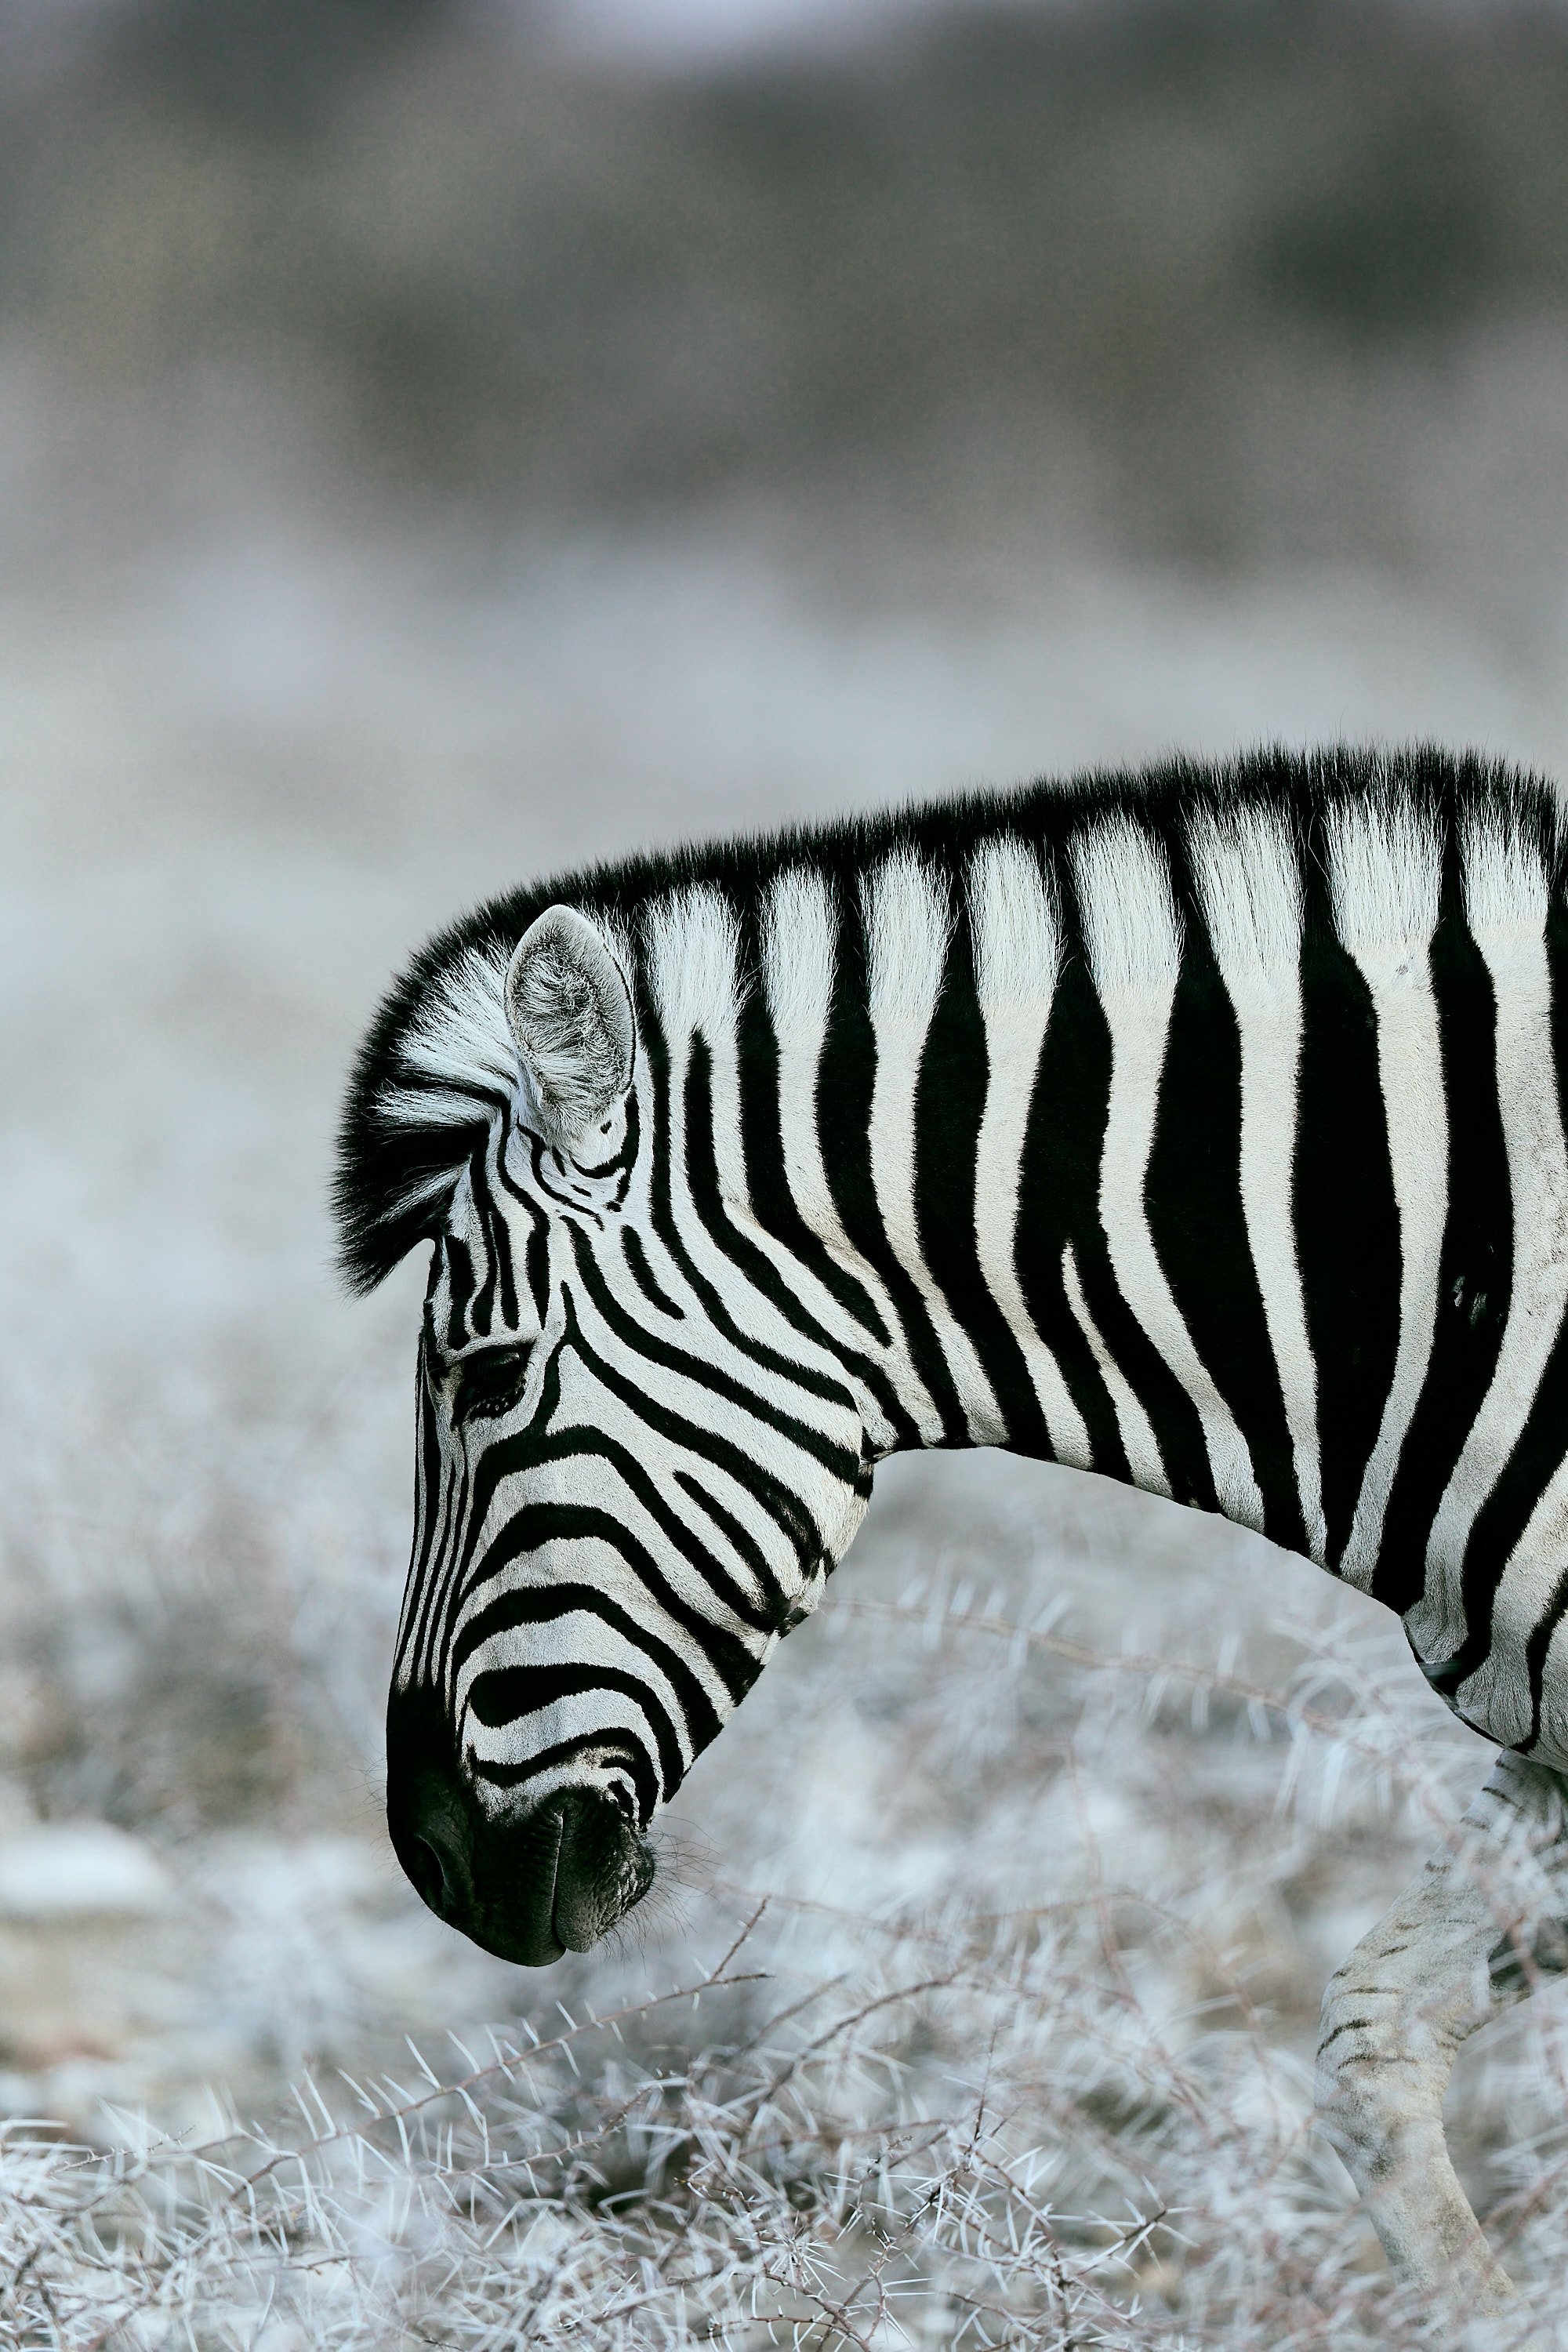
Zebras are some of the most common and abundant species you will see in Etosha, but they still provide very interesting photos
Etosha is home to two zebra species: Burchell’s zebra and the rarer Hartmann’s mountain zebra. These strikingly patterned animals can often be found in large herds, making for dynamic compositions. The contrast between their black-and-white stripes and the dusty terrain is a classic safari image.
Springbok and Other Antelope
Springbok are one of the most abundant animals in Etosha, famous for their graceful leaps known as "pronking." Other antelope species, like kudu, oryx, and black-faced impalas, are also common and provide a wide range of photographic subjects, from close-ups to action shots.

Male impala at sunrise
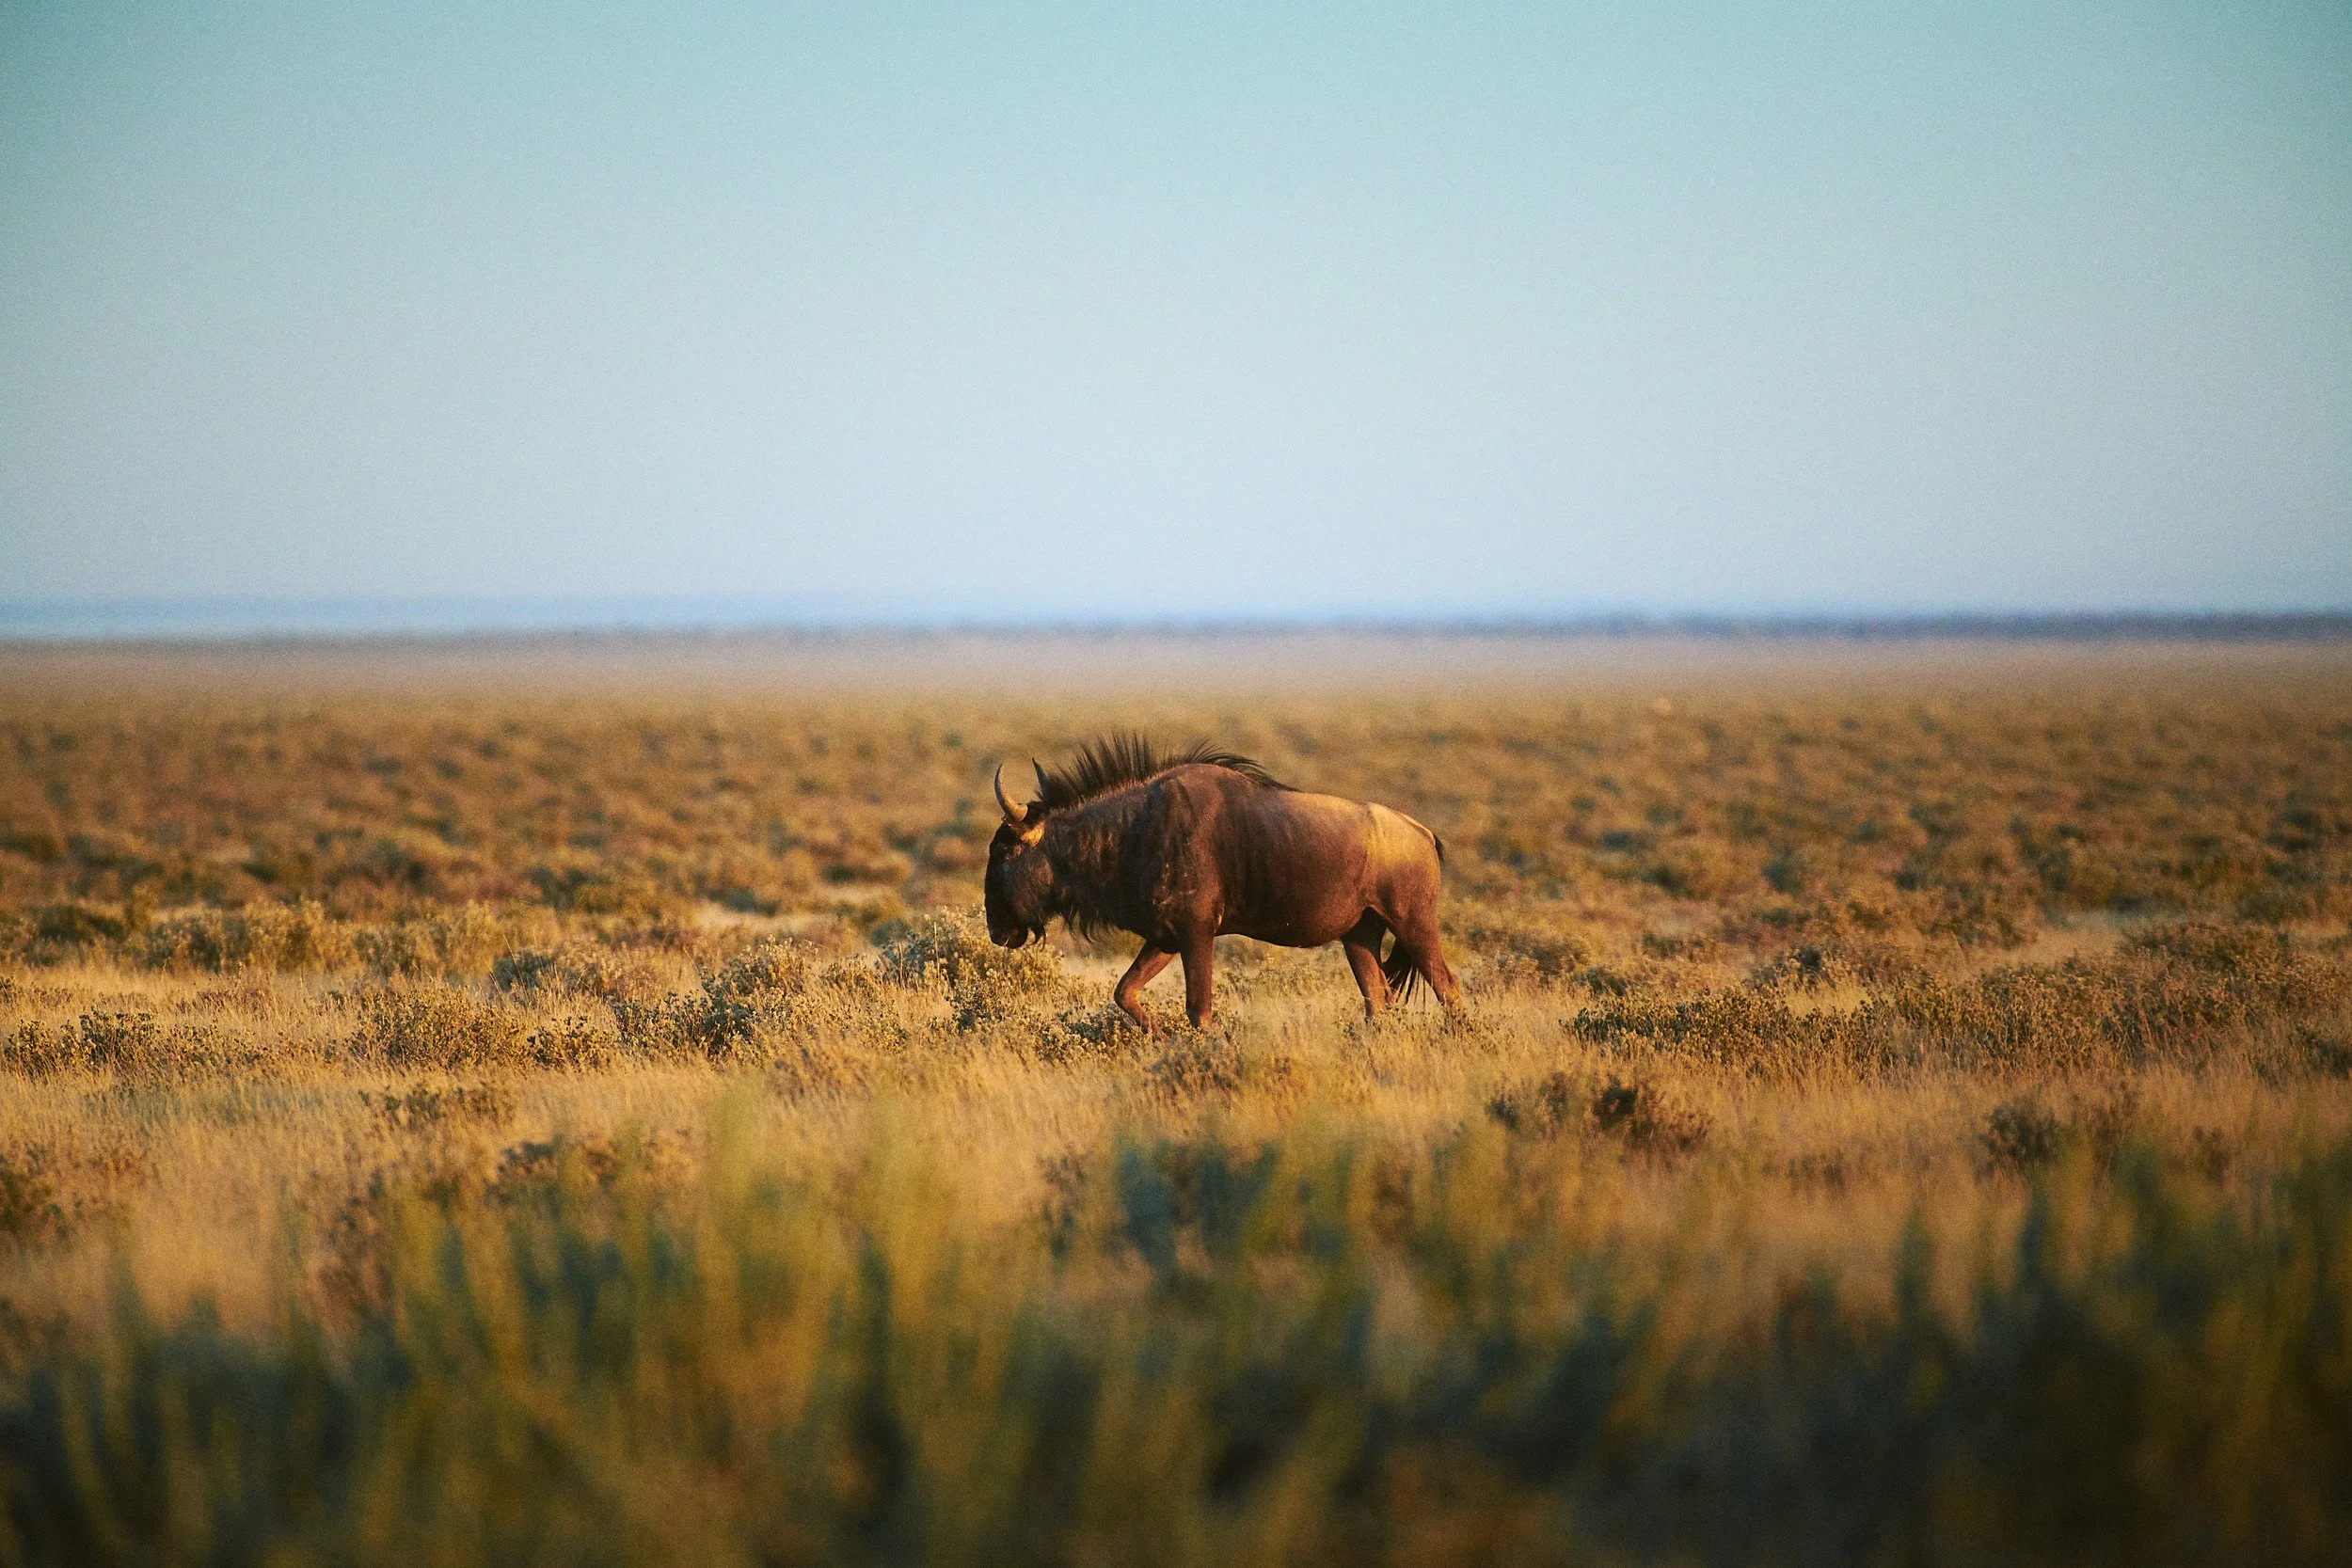
Wildebeest
Often found grazing in the open plains, wildebeest are great subjects for photographing group dynamics. During the dry season, they gather in large herds at waterholes, creating exciting opportunities for dramatic and action-packed shots.

Wildebeest
Best Season for Safari in Etosha
The best time to visit Etosha depends on your photography goals:
Dry Season (May to October): Animals congregate around waterholes, making it easier to spot and photograph wildlife. The dry, dusty atmosphere creates dramatic lighting conditions.
Green Season (November to April): The park is lush and vibrant, with spectacular bird migrations and newborn animals. However the water during this season is abundant so wildlife doesn’t need to come to the waterholes, and abundant vegetation helps animals to hide from our cameras.
While you can get good sightings from May to October-November, in my opinion the best season for wildlife photography in Etosha is towards the end of the dry season, in the months of September and October.
How Long Should You Stay?
Short answer: as long as you can! For a fulfilling safari experience, at least two full days in Etosha is recommended. However, to truly explore the park and maximize your photography opportunities, plan for 5 days or more. Wildlife enthusiasts might even extend their stay; that’s the magic of safari, every day, every game drive is different, and the more time we spend in the park, the better chances we have to get amazing photos.
Join Me in Etosha in 2025
I’m thrilled to announce that I’m organizing two exclusive photography tours to Namibia in 2025, both including Etosha National Park. These trips are designed to provide unparalleled photography experiences, guided by the expertise and knowledge I accumulated in over 20 trips to Namibia. Check out my tour calendar here, and don’t forget to sign up to my newsletter to get early bird discounts.
Etosha National Park is a haven for photographers, offering endless opportunities to capture Africa’s beauty. With the right preparation and a spirit of adventure, your trip will be nothing short of extraordinary. See you in Etosha!

Sunset sky at the end of the dry season. The first clouds are showing up and will soon start to rain.
How Long Should You Stay?
Short answer: as long as you can! For a fulfilling safari experience, at least two full days in Etosha is recommended. However, to truly explore the park and maximize your photography opportunities, plan for 5 days or more. Wildlife enthusiasts might even extend their stay; that’s the magic of safari, every day, every game drive is different, and the more time we spend in the park, the better chances we have to get amazing photos.

Classic Etosha waterhole scene
Join Me in Etosha in 2025
I’m thrilled to announce that I’m organizing two exclusive photography tours to Namibia in 2025, both including Etosha National Park. These trips are designed to provide unparalleled photography experiences, guided by the expertise and knowledge I accumulated in over 20 trips to Namibia. Check out my tour calendar here, and don’t forget to sign up to my newsletter to get early bird discounts.
Etosha National Park is a haven for photographers, offering endless opportunities to capture Africa’s beauty. With the right preparation and a spirit of adventure, your trip will be nothing short of extraordinary. See you in Etosha!


Master your camera: 3 best tricks for Canon
When shooting wildlife I find it very important to focus as much as possible on what the animal is doing and even with todays cameras where the LCD screen is so good, I still like to do it mostly through the viewfinder. It allows me to be more focused and more responsive to action.
I recently published a video sharing my top 3 custom settings that I use all the time when shooting wildlife photography, especially when shooting with big lenses, when handling the camera is not always easy.
When shooting wildlife I find it very important to focus as much as possible on what the animal is doing and even with todays cameras where the LCD screen is so good, I still like to do it mostly through the viewfinder. It allows me to be more focused and more responsive to action.
So the more time I can spend with my eye on the viewfinder the bigger the chance that I will be able to capture a great photo. It’s that small moment when the animal does something different, that might be as simple as staring through the lens, that makes the difference between a decent photo and a great photo.
So, here’s the video with my 3 favorite settings to make sure I will not miss a single shot:

Mastering Back Button Autofocus: A Game-Changer for Your Photography
Are you looking to take your photography skills to the next level? Back button focus (BBF) might be the secret weapon you’ve been missing. This technique, very popular among professional photographers, separates the autofocus function from the shutter button, giving you unparalleled control and precision.

Are you looking to take your photography skills to the next level? Back button focus (BBF) might be the secret weapon you’ve been missing. This technique, very popular among professional photographers, separates the autofocus function from the shutter button, giving you unparalleled control and precision.
With BBF you can lock focus on your subject while freely recomposing your shot—perfect for capturing wildlife, fast action, or any scenario where split-second decisions matter. Plus, it minimizes accidental refocusing, ensuring you get the sharpest images every time.
Curious about how to set it up and use it effectively? I’ve created a detailed video guide walking you through the entire process. Check it out!
This simple adjustment could revolutionize the way you shoot. Watch now and see the difference for yourself!
Need more tips like this? Subscribe to my newsletter and get your free copy of my 100 pages e-book Wildlife Photography for Beginners!